Introduction: Why Exporting & Sharing Matters
Your Jeda.ai workspace is where the thinking happens. Where frameworks come alive, collaborators converge, and strategic insights crystallize. But your work doesn't stay there. It flows into PowerPoint decks for board meetings. It gets embedded in reports for stakeholders. It lands in Word documents, emails, client proposals, and strategic wikis. The visuals you create in Jeda.ai are too valuable to be locked away.
This tutorial shows you five ways to get your AI-generated visuals out into the world. You can copy any visual straight to PowerPoint in three seconds. You can download as PNG for quick sharing. You can export as SVG and then ungroup it in PowerPoint to create fully editable shapes—a workflow that sets Jeda.ai apart. You can export your entire workspace as plain text for documentation. And when you're ready, you can publish your work publicly to the Jeda.ai Gallery and showcase it to over 150,000+ users.
Each pathway serves a different need. You'll learn when to use each one. By the end, you'll know how to export anything, to anywhere, in seconds.
Your 5 Export & Sharing Pathways
Before we dive deep, here's the map. You have five ways to move your work out of Jeda.ai:
- Copy & Paste (Fastest) — Select a visual, copy it, paste it into PowerPoint, Word, email. Three seconds. No download. This is how most users get quick wins.
Download as PNG — One-click export of what you see on screen with a white background. Works on every plan. Most compatible with external tools.
Download with Transparent Background — Same as PNG but with transparency. Lets you layer visuals on colored backgrounds in PowerPoint or Figma. Requires Black Belt ($10/mo) or higher.
Download as SVG & Ungroup in PowerPoint — Export as a vector file, import into PowerPoint, ungroup to create editable shapes. This is the workflow that makes Jeda.ai unique. Requires Black Belt+ ($10/mo).
- Publish Publicly & Share — Make your workspace public with a shareable URL, or submit it to the Jeda.ai Gallery to showcase to 150,000+ users. Works on all plans.
Choose your path based on your need and your plan. We'll cover each in detail.
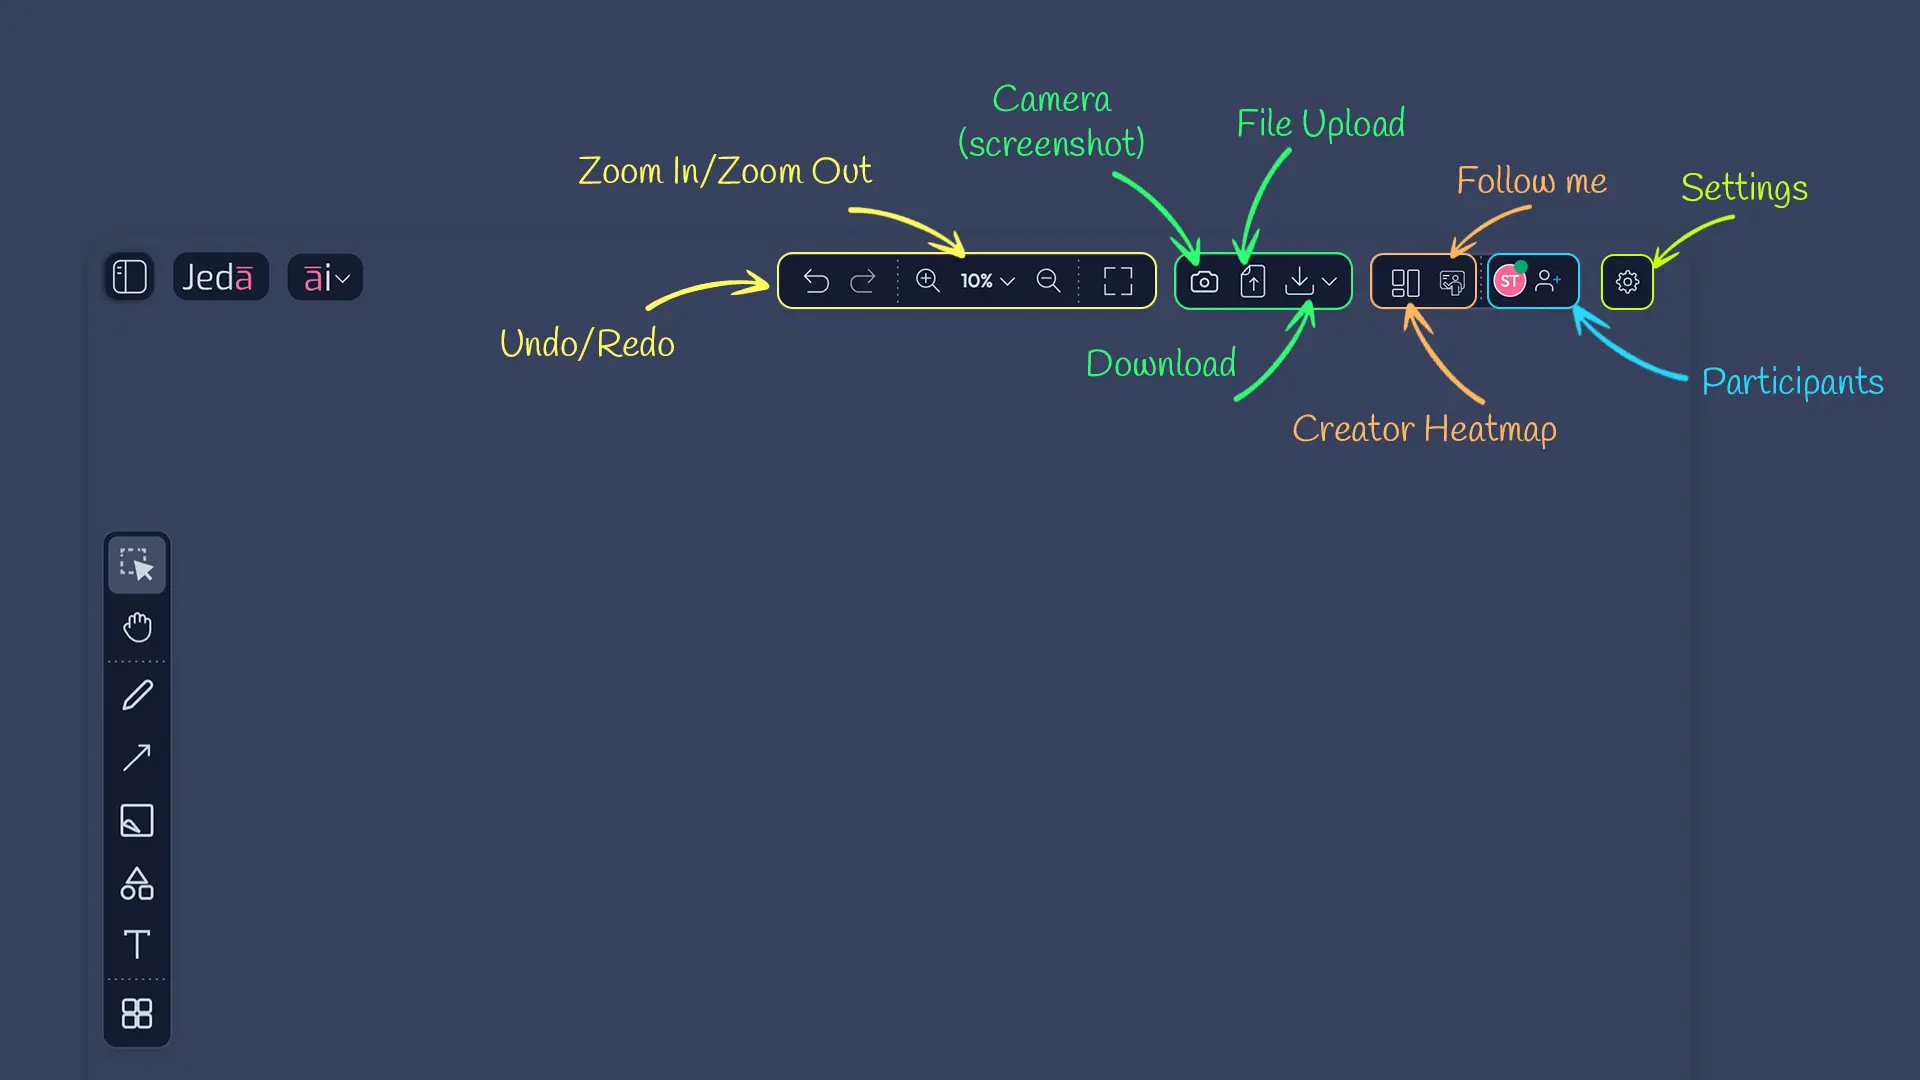
The 4 Download Export Formats
Let's talk about what you get when you click the Download button in the top-right toolbar.
Visible Area with Background
This is your baseline. Click Download, choose "Visible Area – Background," and you get a PNG file of everything you see on your canvas, with a white background. No cropping, no surprises. Whatever's in your viewport comes down as an image.
Best for: Quick shares, Slack messages, emails, social media posts, anywhere you need a fast screenshot. Plan: All plans (White Belt, Black Belt, Shifu, Alchemist). File type: PNG (raster, not editable).
Why choose this? It's instant. It works everywhere. PNG is universally compatible. You don't need to think about what you're sharing—you get exactly what you see. Download it, email it, done.
The trade-off? PNG is flat. You can't edit individual elements after export. If you need to tweak colors or text in PowerPoint, you'll need to come back to Jeda.ai and regenerate, or use an image editor. For most uses, though, that's not a problem.
Visible Area with Transparent Background
This one's a game-changer if you're layering visuals. Same export as above, but the white background is transparent. Now you can drop that mind map onto a colored background in PowerPoint. Or overlay it on a photo. Or blend it into a design in Figma.
Best for: Presentations where you're using colored slide backgrounds, design composites, branding materials. Plan: Black Belt ($10/mo), Shifu ($39/mo), Alchemist ($298/mo). Requires upgrade: Yes, from White Belt.
How does it work? In Workspace Settings (gear icon, top-right), there's a Download section. Toggle "White background" to OFF. Now your PNG exports come out transparent. Click PNG to download.
When should you use this? You're designing a presentation with a teal background, and you want a mind map that floats on that teal, not on a white rectangle. Transparent background makes it seamless.
Workspace as Text
This one's unique. Jeda.ai gives you the ability to export all your workspace text as a plain .txt file. Every label, every note, every description—everything that's written on your canvas gets captured as structured text.
Best for: Documentation, archiving, pasting content into your wiki or knowledge base, creating a text-only backup of your thinking. Plan: Black Belt+ ($10/mo). File type: .txt (plain text, fully editable).
Why would you use this? Imagine you just created a detailed SWOT analysis in Jeda.ai. The matrix is beautiful visually. But you also need to write it up in a strategic document. Instead of re-typing, export as text. All the content is there, ready to paste into your Google Doc or Word file. No re-work. No transcription errors.
Another scenario: You're archiving a major project. Export as text to create a text-only record alongside your visual exports. Years later, the text is still searchable and readable, even if image formats change.
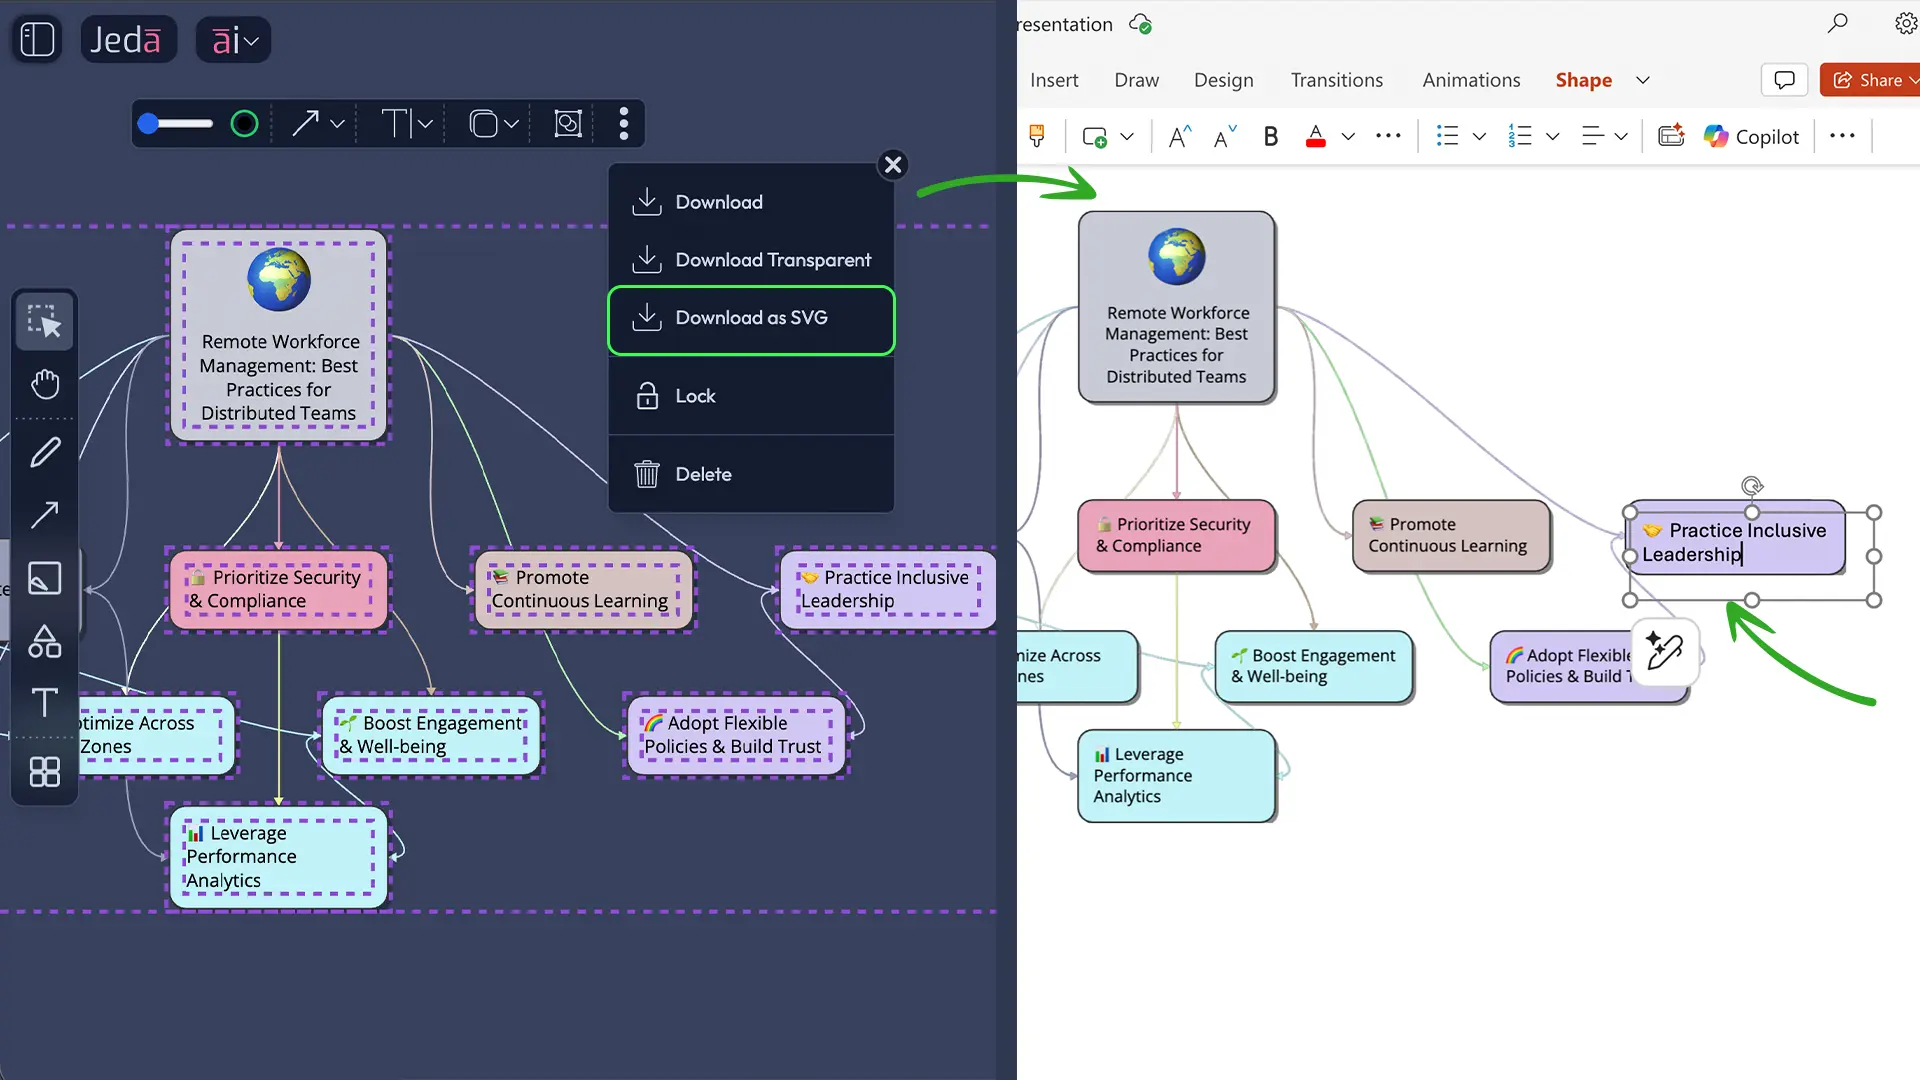
Workspace as SVG
Here's where Jeda.ai's export game gets powerful. SVG stands for Scalable Vector Graphics. It's a file format where every shape, line, and text element is stored as a vector. Infinitely scalable. Endlessly editable. And—critically—PowerPoint can import SVG files and convert them into editable shapes.
Best for: Creating PowerPoint visuals that your team can edit, design refinement, layering in other vector tools (Figma, Adobe Illustrator). Plan: Black Belt+ ($10/mo). File type: SVG (vector).
Why is this powerful? Unlike PNG, which is a flat image, SVG is a structured file. When you import an SVG flowchart into PowerPoint and ungroup it, each box becomes an individual shape. Each connector is editable. Each text label can be tweaked. You get the visual quality of Jeda.ai-generated content with the editability of native PowerPoint objects.
We'll dive deeper into the SVG-to-PowerPoint workflow below. For now, know this: If you're giving your work to a team that needs to modify it in PowerPoint, SVG is your answer.
Fastest Workflow: Copy & Paste to External Apps
Here's the secret most users don't know: The fastest way to get a visual into PowerPoint isn't through Download at all. It's copy and paste.
Copy Any Visual to Word or PowerPoint in 3 Steps
You've generated a beautiful roadmap in Jeda.ai. You're in a meeting in 30 seconds and you need it in PowerPoint. Here's what you do:
Step 1: Select the visual. Click on the roadmap on your canvas. The object gets a selection border.
Step 2: Copy it. Press Cmd+C (Mac) or Ctrl+C (Windows). It's on your clipboard.
Step 3: Paste into PowerPoint. Switch to PowerPoint, click on a slide, and press Cmd+V (Mac) or Ctrl+V (Windows). Your roadmap appears on the slide as an image.
Total time: 10 seconds. No download dialog. No file management. No intermediate steps.
- Select Your Visual on the Canvas
Click the object you want to copy. A selection border appears around it. You've got it in focus.
- Copy (Cmd+C / Ctrl+C)
Press the keyboard shortcut. The visual is now on your clipboard, ready to go anywhere.
- Paste Into Word, PowerPoint, or Email (Cmd+V / Ctrl+V)
Switch to your destination app, click where you want it, and paste. The visual appears instantly.
Why Copy & Paste Beats Download Sometimes
This workflow is faster for several reasons. There's no dialog. No file-saving step. No "where did that PNG go?" searching on your desktop. You copy from Jeda.ai, paste into your presentation, and move on.
This works best when you're exporting individual visuals, not your entire workspace. When you need one matrix or one flowchart, copy and paste is unbeatable. When you need to export everything you've created, the Download options are more powerful.
Limitation: This pastes a static image, not editable shapes like the SVG-to-PowerPoint workflow below. But for most quick presentations, that's exactly what you want—a finished visual that looks polished and doesn't need tweaking.
Quick Downloads from Workspace Settings
There's a speed hack hidden in your Workspace Settings. Most users never find it.
PNG & TXT One-Click Export from Settings
Go to Workspace Settings (gear icon ⚙️ in the top-right toolbar). Click the Settings tab. Scroll down. You'll see a section labeled "Download (visible area)." In that section are two buttons: PNG and TXT.
Click PNG. Your visible area downloads as PNG instantly. No toolbar menu. No dialog asking you to choose options. One click. Done.
Click TXT. Your workspace text exports. Also instant.
Why use this instead of the top toolbar Download? When you're doing single quick exports, these buttons are faster. No dropdown menu. No choosing between options. One intention, one click. This is pure efficiency.
The White Background Toggle
Right above those PNG and TXT buttons is a toggle labeled "White background."
ON (default): Your PNG exports with a white background. Clean, simple, professional for most presentations.
OFF: Your PNG exports with a transparent background. Useful if you're layering on colored slides or compositing in design tools.
Toggle it, then click PNG. Your next export respects the setting. It's a one-second change that gives you flexibility without upgrading your plan to Black Belt.
But here's the thing: This toggle only affects visible area exports from Settings. It doesn't affect SVG exports or the full workspace export. Those have their own options in the top-toolbar Download menu.
The SVG-to-PowerPoint Editable Shapes Workflow
This is where Jeda.ai's export capabilities really shine. This workflow is not common in other AI workspace tools, and it's worth learning.
What Makes This Unique
Most AI tools export as PNG—a flat image. You get a picture. It looks good. But you can't edit it. If you need to change the color of a box, you go back to the tool, regenerate, re-export. Annoying.
Jeda.ai lets you export as SVG, a vector format. When you import an SVG into PowerPoint and ungroup it, PowerPoint converts each element (every box, every line, every text label) into an editable shape. Now you own every part of your visual. Change text. Adjust colors. Rearrange layout. No re-generating. No returning to Jeda.ai. It's pure PowerPoint-native editing.
This is powerful because it combines Jeda.ai's AI-generation speed with PowerPoint's editing familiarity. You get the best of both.
Step-by-Step: SVG Export → PowerPoint → Ungroup
Let's walk through the full workflow.
- Export from Jeda.ai as SVG
Go to the top-right toolbar, click Download, and select 'Workspace as SVG.' Your entire visible workspace downloads as a .svg file to your computer.
- Open Your PowerPoint Presentation
Navigate to the slide where you want to insert your visual. Have the SVG file ready on your desktop.
- Insert the SVG File
In PowerPoint, go to Insert > Pictures > This Device. Choose your .svg file. Click Insert. The SVG appears on your slide as an image.
- Convert to Editable Shapes (Ungroup)
Right-click the image on the slide. Look for 'Convert to Shapes' or 'Ungroup Graphics' (the exact wording varies by PowerPoint version). Click it. PowerPoint converts the SVG into individual shape objects.
- Edit as Native PowerPoint Shapes
Now each element is selectable and editable. Click on a box to change its color, text, or position. Click on a connector to restyle it. Treat it like you'd treat any native PowerPoint object.
After ungrouping, you have full control. Change that red box to blue. Update the label in a flowchart step. Rearrange the layout of a matrix. Everything is editable.
When to Use This Workflow
You have a finished Jeda.ai visual and you're presenting it to executives in PowerPoint. During the meeting, someone asks: "Can you change that to blue?" Or: "What if we added one more step here?" With the SVG-to-ungroup workflow, you say yes on the spot. Edit live in PowerPoint. Show the change in real-time.
You're building a client deck. You generated a competitive matrix in Jeda.ai. But your client wants to tweak a few labels. Export as SVG, ungroup in PowerPoint, send them an editable deck. They can make changes without needing Jeda.ai access.
You're designing a strategic roadmap and you know it'll need tweaks during review. Export as SVG, import to PowerPoint, ungroup, and hand it to your team for real-time collaboration in PowerPoint's editing environment.
Important note: This workflow assumes you're using PowerPoint on a recent version (Office 365 or newer). Older versions or other presentation tools (Google Slides, Keynote) may not have the ungroup feature. Always test on your version first.
Publishing & Sharing Your Workspace
Export gets your visuals into presentations and documents. Publishing gets your work in front of audiences. These are different things, and both matter.
Publish a Workspace Publicly
When you publish a workspace, you generate a public URL. Anyone with that URL can view your workspace in read-only mode. They see everything: your visuals, your thinking, your frameworks. But they can't edit. They can't download. They only see.
How to publish: Go to Workspace Settings (gear icon, top-right toolbar). Click the Settings tab. Scroll to "Publish Workspace." Toggle it ON. A public URL is generated. Copy that link. Share it.
What viewers can do: Click the link, see your workspace, explore the canvas, read all your content. They get a live view of your finished work.
What viewers can't do: Edit visuals, download exports, modify anything. They're viewing only.
Why publish? You've created a killer strategic framework. You want to share it with your team, clients, or the public. Publishing gives you a stable URL you can share in email, Slack, or LinkedIn. The workspace lives online and anyone you trust with the link can see it.
Option: In Publish Workspace settings, you can toggle "Show contributor names" on or off. ON means your name (and any collaborators' names) appears on the published page. OFF means it's anonymous. Choose based on your preference.
Share Workspace URLs with Collaborators
Publishing is for read-only sharing with the world. But what if you want collaborators to edit the workspace in real-time?
How to add collaborators: Go to the top-right toolbar. Click the Add Participant icon (person with a plus sign). A panel opens. Enter an email address. Assign a role: Owner, Contributor, or Viewer.
Roles:
- Owner: Full control. Can edit, delete, publish, manage collaborators.
- Contributor: Can edit the workspace. Can't manage settings or remove collaborators.
- Viewer: Read-only. Can see everything, edit nothing.
When you add a collaborator as Contributor, they get email access. They log in. They see your live workspace. You're both working in it at the same time. Changes sync. Chat history persists across collaborators. You see their cursor. They see yours.
This is different from publishing because collaborators are actively editing alongside you, not just viewing a finished snapshot. This is your real-time collaboration layer.
Submit Your Work to the Jeda.ai Gallery
The Jeda.ai Gallery is a curated community showcase. Workspaces that get featured are seen by 150,000+ Jeda.ai users. It's where templates, frameworks, and best practices live. It's where builders discover workflows and get inspired.
How to submit: Your workspace must be published first (see above). Then go to Workspace Settings > "Publish to Gallery" toggle. Turn it ON. You'll see a submission form. Fill it out. Submit.
What happens next: An admin reviews your submission. They check that it's a complete, useful, well-crafted workspace. If it passes, it appears in the Gallery. Users can see it, learn from it, maybe even use it as a template for their own work.
Why submit? You've built something valuable. The Gallery lets you share that value with the community. You get recognition. You build authority. You help others work faster. It's a win across the board.
Note: Gallery submission is optional. You can publish without submitting to the Gallery. You can also unpublish anytime. The Gallery is a discovery layer, not a requirement.
Export Plan Restrictions & Feature Matrix
Let's be transparent. Export capabilities vary by plan. Here's exactly what you get on each.
| Feature | White Belt (Free) | Black Belt ($10/mo) | Shifu ($39/mo) | Alchemist ($298/mo) |
|---|---|---|---|---|
| Copy & Paste | ✓ | ✓ | ✓ | ✓ |
| Visible Area PNG (White Background) | ✓ | ✓ | ✓ | ✓ |
| Visible Area PNG (Transparent) | — | ✓ | ✓ | ✓ |
| Workspace as Text | — | ✓ | ✓ | ✓ |
| Workspace as SVG | — | ✓ | ✓ | ✓ |
| Publish Workspace | ✓ | ✓ | ✓ | ✓ |
| Share with Collaborators | ✓ | ✓ | ✓ | ✓ |
| Gallery Submission | ✓ | ✓ | ✓ | ✓ |
Translation:
White Belt (Free): You can copy and paste visuals. You can export visible area as PNG with white background. You can publish and share. But you can't access transparent PNG, text export, or SVG export.
Black Belt ($10/mo): You unlock everything. Transparent PNG, SVG export, text export. Plus all the core features of Black Belt (unlimited AI tasks, team collaboration, 300+ AI Recipes, no attribution).
Shifu ($39/mo): Everything Black Belt has, plus advanced models, Data Insight, Document Insight, Multi-LLM Agent, Web Search, Dynamic Prompt, Vision Transform. Export is the same as Black Belt—you have all four download formats.
Alchemist ($298/mo): All of Shifu, plus top-tier models (o3, Claude Opus 4.5) and higher processing caps. Export remains the same as Black Belt/Shifu—the difference is in AI model access, not export.
Key insight: Export format variety tops out at Black Belt. Upgrading to Shifu or Alchemist gives you more AI horsepower and advanced features, but not additional export formats. You get transparency and SVG at the Black Belt tier and that's the ceiling for export-specific features.
Want to upgrade? Go to My Account > Edit Plan. The Stripe portal opens. You can switch plans anytime. Your subscription prorates. Upgraded workspaces can export immediately. Past exports stay as they were (no retroactive changes).
Frequently Asked Questions
What's the fastest way to get a visual into PowerPoint?
Select the visual, copy it (Cmd+C / Ctrl+C), switch to PowerPoint, and paste (Cmd+V / Ctrl+V). Total time: 10 seconds. No download, no dialog. This works on all plans and no upgrade needed.
What's the difference between PNG and SVG export?
PNG is a raster image—a flat picture. You see exactly what you created, but you can't edit individual shapes after export. SVG is a vector file. When you import it into PowerPoint and ungroup it, each element becomes an editable shape. SVG gives you post-export flexibility; PNG gives you compatibility and speed.
Can I export with a transparent background on White Belt (free)?
No. Transparent background export is a Black Belt ($10/mo) feature. On White Belt, you can only download with white background. But you can always copy and paste (all plans) and use the copy/paste workflow instead.
What happens if I publish my workspace? Can I unpublish later?
Publishing makes your workspace publicly accessible via a shareable URL. Yes, you can unpublish anytime. Go to Workspace Settings > Publish Workspace > toggle OFF. The URL becomes inaccessible. Your workspace is private again. Old links won't work.
What does "Workspace as Text" export include?
All text content from your workspace—titles, labels, descriptions, notes, comments—as a plain .txt file. No visuals, no formatting, just the text. Useful for documentation, archiving, or pasting into a wiki or knowledge base. Requires Black Belt+ ($10/mo).
Is there a file size limit on SVG exports?
No hard limit, but very large workspaces create larger SVG files. For presentations, stick to visible area exports or smaller sections. If your SVG file is over 10 MB, PowerPoint may struggle to ungroup it. Test before presenting.
Do collaborators see my published workspace?
Only if they have the public URL. Publishing is separate from collaboration. Collaborators invited via email get live editing access to the workspace (not the published snapshot). Public viewers see only the published read-only version. You control who sees what.
Can I export individual shapes or just the entire visible area?
For full control, select shapes individually, then copy/paste (instant, all plans). Or download the entire visible area and crop it in an image editor. The Download options export your entire viewport; you can't cherry-pick shapes in the download menu.
What's the Jeda.ai Gallery and why submit my work?
The Gallery is a community showcase of workspaces built by Jeda.ai users. Featured templates, frameworks, and examples live there. Submitting displays your work to 150,000+ Jeda.ai users, builds your reputation, and helps others discover powerful workflows. It's optional but rewarding.
How long does Gallery submission approval take?
Admin review typically takes 1–3 business days. You'll get email notification when your workspace is approved or if revisions are requested. Featured workspaces get highlighted in the Gallery and can become widely-used templates.
Can I share my workspace with edit permissions?
Yes. Use the Add Participant feature (top toolbar, person + icon). Invite by email and assign Contributor role. They can edit the workspace in real-time alongside you. You can also assign Viewer role for read-only access.
Is there a limit on how many times I can export?
No. Export as many times as you want. Each plan has format limits (what's available to you), but no quantity limits. Export 100 times today, 100 more tomorrow. As much as you need.
Can I batch-export multiple workspaces at once?
Not built-in. Export each workspace individually. (Pro tip: If you're exporting dozens of workspaces, set up a template workflow in your mind map, then export incrementally as you iterate.)
Does exporting reduce the quality of my visual?
No. PNG and SVG exports preserve full quality. Your visual looks identical when pasted into PowerPoint, embedded in Word, or uploaded to the web. Jeda.ai's export doesn't compress or degrade your work.
Can I embed a published workspace directly on my website?
Currently, you share the public URL. In the future, Jeda.ai may support embedded iframes. For now, link to your published workspace or export as PNG/SVG and embed the image file on your website.
Next Steps
You now know how to export your work to presentations, documents, and shared formats. But exporting isn't the end—it's a bridge. Here's where to go next.
Combine export with collaboration: Check out Tutorial 2.7 (Collaboration & Sharing) to learn how multiple teammates can work in the same workspace in real-time, then export the final version together.
Refine before exporting: Tutorial 1.5 (Editing Visuals) teaches you how to polish every smart shape, connector, and text element. Export with confidence knowing your visual is perfect.
Generate higher-quality visuals to export: Tutorial 3.1 (Multi-LLM Agent) shows how to run multiple AI models simultaneously for richer outputs, and Tutorial 3.2 (Dynamic Prompt) guides you through AI-powered prompt refinement. Better inputs, better exports.
Your AI visuals are now everywhere. PowerPoint decks. Strategic documents. Client proposals. Public galleries. Shared repositories. Let Jeda.ai be your visual thinking partner across every tool you use.