Getting Started with Canvas Tools
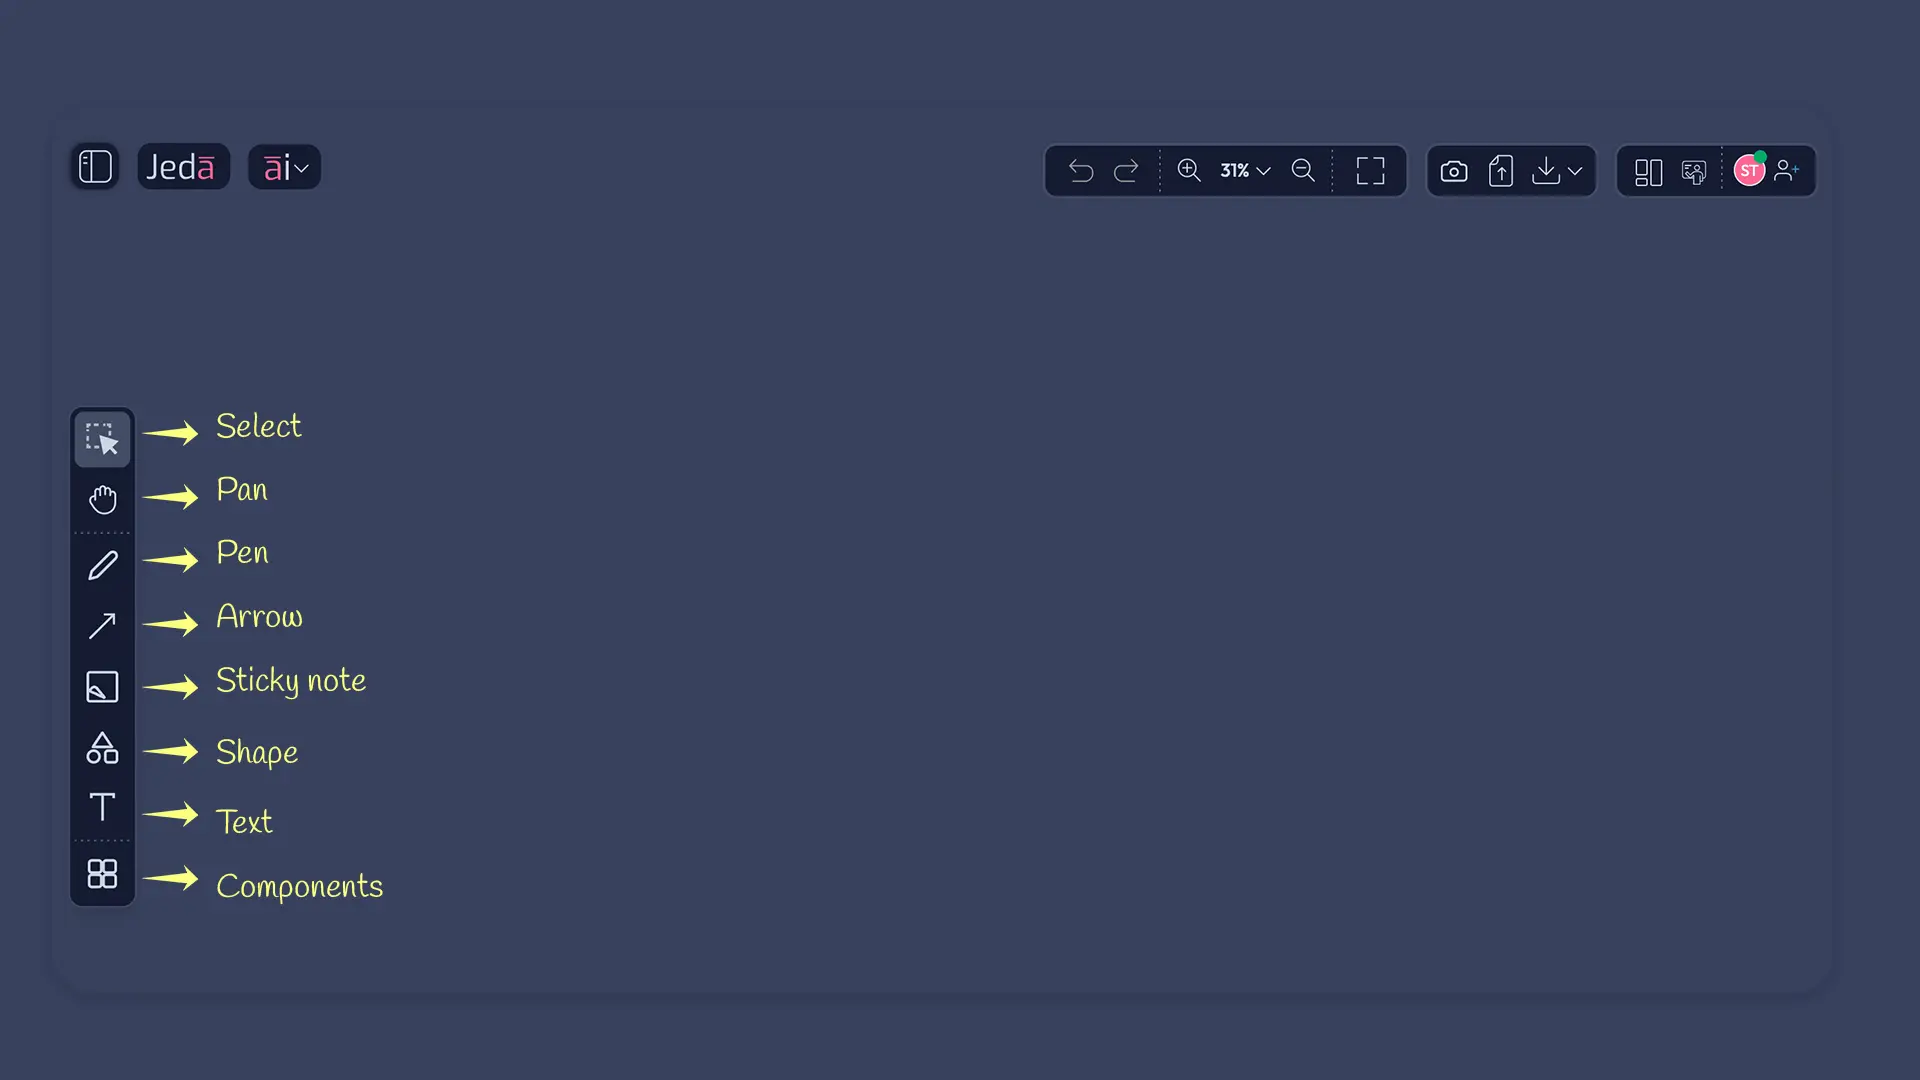
Jeda.ai is the AI Workspace for visual thinking. Its canvas drawing tools sit in the left sidebar, ready to configure and deploy. From Select and Pan for navigation, to the Pen tool's four annotation modes, plus Arrow/Line, Smartshape, Shape, Text, and a rich Components library—these eight tools form the backbone of manual object placement. The key principle? Set properties in the left sidebar before clicking the canvas. Once placed, use the floating toolbar for quick edits. And here's a speed trick: Canvas Typing lets you add notes without switching tools at all. Used by 150,000+ users worldwide, Jeda's canvas tools are engineered for brainstorming, diagramming, annotation, and rapid visual communication.
The Select and Pan Tools
Using Select to Choose and Edit Objects
Click any object to select it. A red dashed border appears, along with canvas controls: a plus icon for adding related objects, ai+ for AI extensions, resize handles around the perimeter, and a rotation control at the top. Once selected, the floating toolbar shows quick-edit options (color, alignment, delete). Want to select multiple objects? Click and drag across your canvas—everything in the selection rectangle gets highlighted. The Select tool is your gateway to object manipulation and is always available from the left sidebar.
Pan to Navigate Your Canvas
Large canvases need navigation. Click the Pan tool (hand icon) and drag to move your view without selecting anything. Alternatively, hold Spacebar while using any other tool and drag—temporary pan mode. Useful when you're zoomed in and need to move across the canvas without breaking your drawing flow. Pan preserves your zoom level and doesn't affect objects.
Mastering the Pen Tool
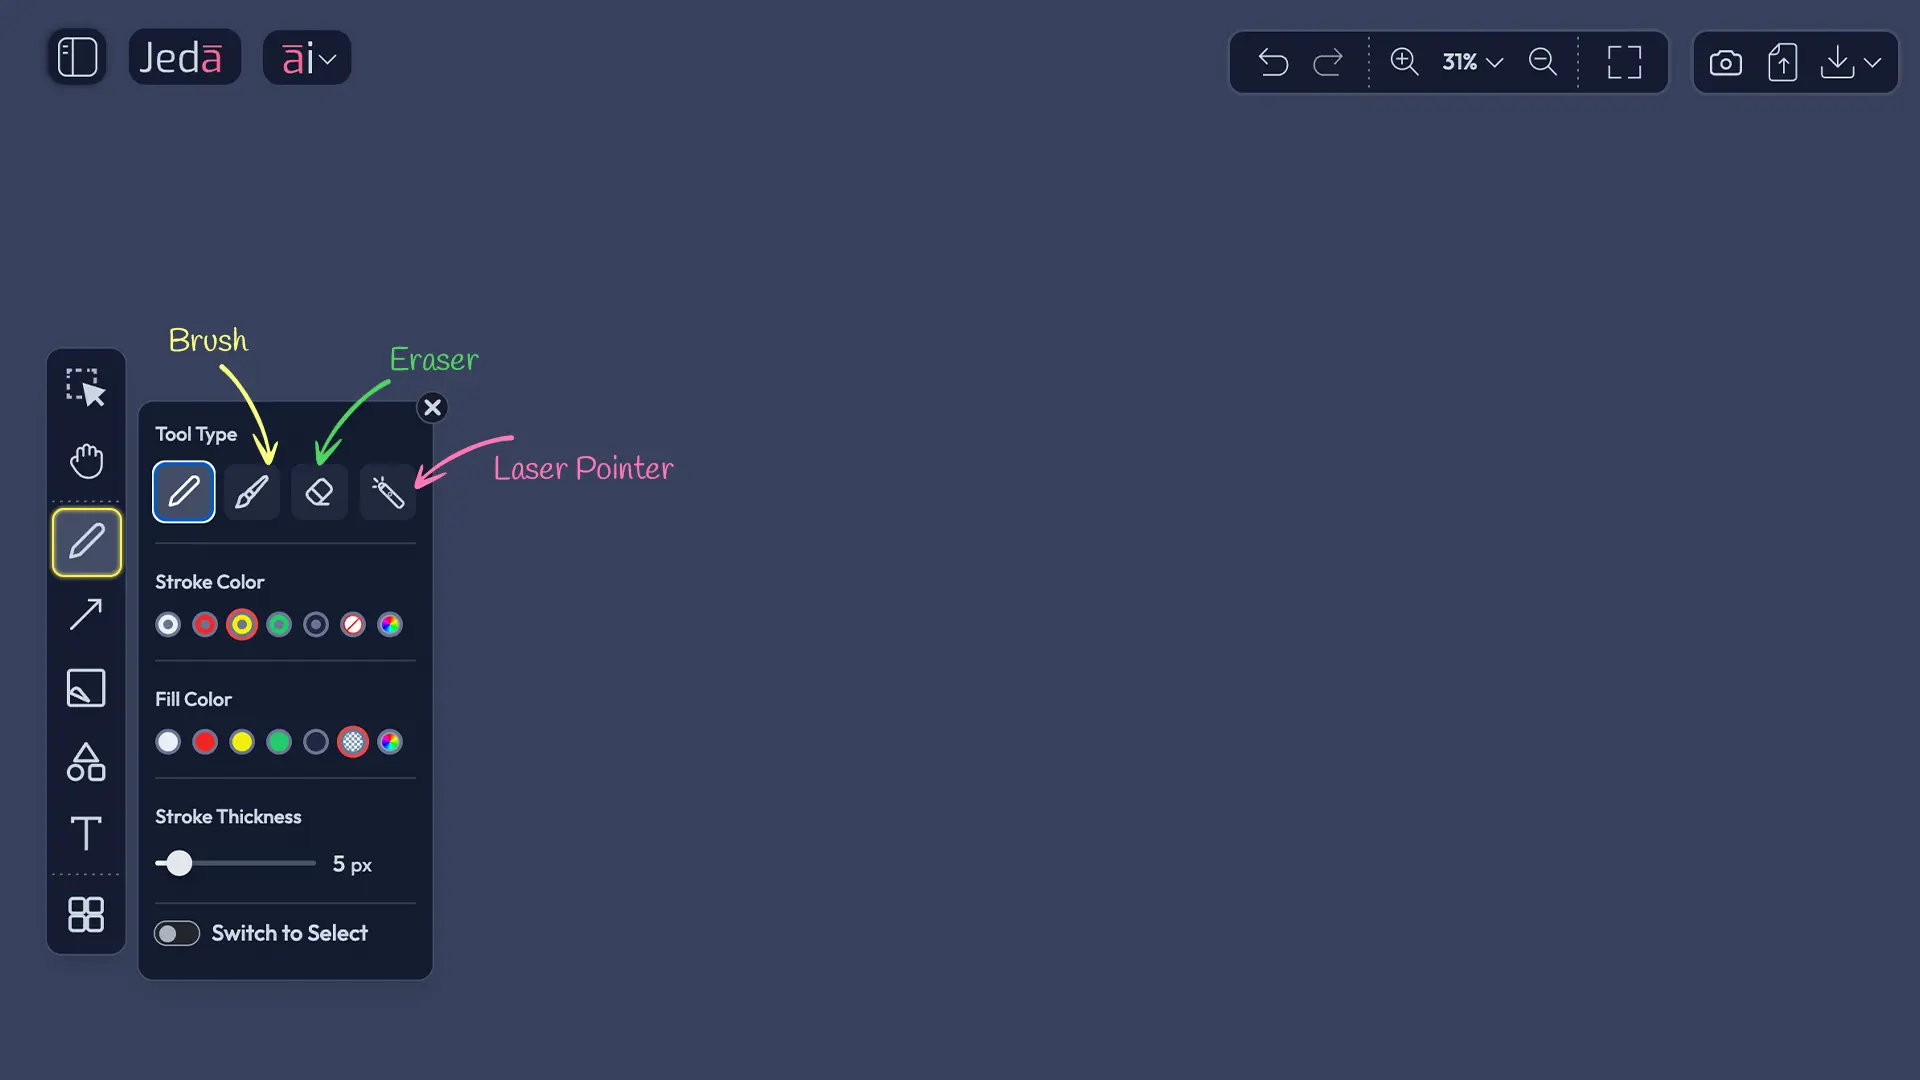
The Pen tool is your freehand drawing engine and lives in the left sidebar. It has four distinct modes—Pen, Brush, Eraser, and Laser Pointer—each optimized for different annotation and sketching tasks. Before you draw, pre-set stroke color (7 presets + color picker), fill color, and thickness in the left sidebar settings panel. These settings apply to all strokes until you change them. Once drawn, use the floating toolbar to tweak properties on the fly.
Pen Mode – Freehand Drawing with Auto Shape
Standard freehand drawing with natural pressure simulation. Here's the differentiator: if you enable Auto Shape in your Workspace Settings, Jeda's Visual AI detects hand-drawn shapes and converts them into perfect geometry. Draw a line, circle, rectangle, square, oval, or diamond in one continuous stroke—Jeda instantly recognizes the shape and transforms it while keeping the hand-drawn aesthetic intact. No need to switch to Shape tool or manually adjust. Press Spacebar mid-stroke to temporarily pan if you need to reposition your view.
Auto Shape works only in Pen mode and must be enabled in Workspace Settings. Supported shapes: lines, circles, rectangles, squares, ovals, diamonds. Pressure simulation gives hand-drawn feel. One continuous stroke = one shape.
Brush Mode – Marking and Highlighting
Thicker, more opaque strokes perfect for emphasis and annotation. Use Brush for highlighting areas, marking up diagrams, or adding bold visual calls-to-attention. Same color and thickness pre-set options as Pen. Brush feedback is immediate and snappy—ideal for rapid annotation workflows.
Eraser Mode – Remove Strokes
Selectively erase drawn strokes without affecting other objects (shapes, text, components). Eraser size is adjustable in the settings panel. Clean up mistakes or refine drawings without resorting to Undo. Perfect for iterative sketching where you're building and refining in real-time.
Laser Pointer Mode – Temporary Highlight
Unique to Jeda. Laser Pointer creates a temporary highlight that fades after a few seconds—it doesn't permanently mark your canvas. Ideal for presentations and Follow Me mode to draw audience attention to specific areas without leaving visual clutter. Use Laser Pointer when facilitating live demos or walkthroughs and you want emphasis without permanence.
Arrow and Line Tool
Draw connections between objects with the Arrow/Line tool. Toggle between Arrow (with arrowhead) and Line (plain connector). Pre-set stroke color and thickness in the left sidebar before clicking the canvas. Click your starting point, then click (or drag for curved connectors) your ending point. Both arrows and lines become selectable objects with their own canvas controls and floating toolbar—resize, recolor, or adjust thickness after placement. Extremely useful for flowcharts, process diagrams, relationship mapping, and system flows. The Arrow/Line tool brings structure to your canvas without requiring manual shape placement.
- Select Arrow/Line Tool
Click the Arrow/Line tool in the left sidebar (icon shows arrow or line, depending on last selection).
- Set Stroke Properties
Configure stroke color (7 presets + picker) and thickness in the left sidebar settings panel. These apply to all subsequent arrows/lines until changed.
- Choose Arrow or Line
Toggle between "Arrow" (with arrowhead) and "Line" (plain) in the settings panel.
- Draw the Connection
Click your starting point on the canvas, then click your ending point. Drag for curved connectors; click for straight lines.
- Edit with Floating Toolbar
Select the arrow/line to reveal floating toolbar. Adjust color, thickness, or other properties without re-drawing.
Smartshape – Shapes with Embedded Text
Smartshape is a hybrid: it places a shape AND pre-embeds a text field. Use Smartshape for labeled boxes, flowchart symbols, speech bubbles, or any shape that needs built-in text. Unlike the Shape tool (which is freeform-only), Smartshape assumes you'll add a label or annotation. This tool is the fastest way to build structured diagrams.
Shape Type Library
Smartshape offers a rich library: rectangle, circle, diamond, speech bubble, triangle, pentagon, hexagon, and more. Pre-select your shape type in the left sidebar before placement. Click the canvas and a text field auto-activates—start typing immediately. Change shape type anytime via the floating toolbar.
Border and Fill Customization
Smartshape is highly customizable. Background Color (7 presets + color picker), Border Color (7 presets + color picker), Border Type (solid, dashed, dotted), Border Thickness (slider), Border Roundness (for softer corners), and Shadow Type (off, soft, hard). Configure all of these in the left sidebar before placement, or use the floating toolbar for quick tweaks after. A single Smartshape can anchor your entire diagram if text and styling are dialed in.
When to Use Smartshape vs. Shape
Smartshape: You plan to label or annotate (flowcharts, org charts, process diagrams, labeled decision trees, annotated boxes).
Shape: Freeform drawing, background decoration, visual separation, or sketching where text isn't required.

Shape Tool – Freeform Shapes Without Text
Shape is simpler than Smartshape. Four basic shapes: Rectangle, Circle, Ellipse, Triangle. No embedded text field (use the Text tool separately to label shapes). Pre-set stroke color, fill color, and stroke thickness in the left sidebar, then click the canvas to place. Shape is faster for sketching, backgrounds, or visual separation when you don't need embedded labels. Switch back to Select tool anytime by toggling in the left sidebar.
Quick Shapes for Annotation
Rectangles highlight areas or create frames. Circles emphasize key points or mark important zones. Ellipses add organic shapes for softer visual breaks. Triangles direct attention or indicate directional flow. Shape tool is faster than freehand drawing if you need clean geometry without the overhead of Smartshape's text fields.
Text Tool and Canvas Typing
Jeda offers two pathways to add text: the dedicated Text tool (left sidebar) and Canvas Typing (type anywhere, no tool switch). Learn both and use each for maximum efficiency. Neither requires Auto Shape or any special setting—just click and type.
Text Tool – Dedicated Text Objects
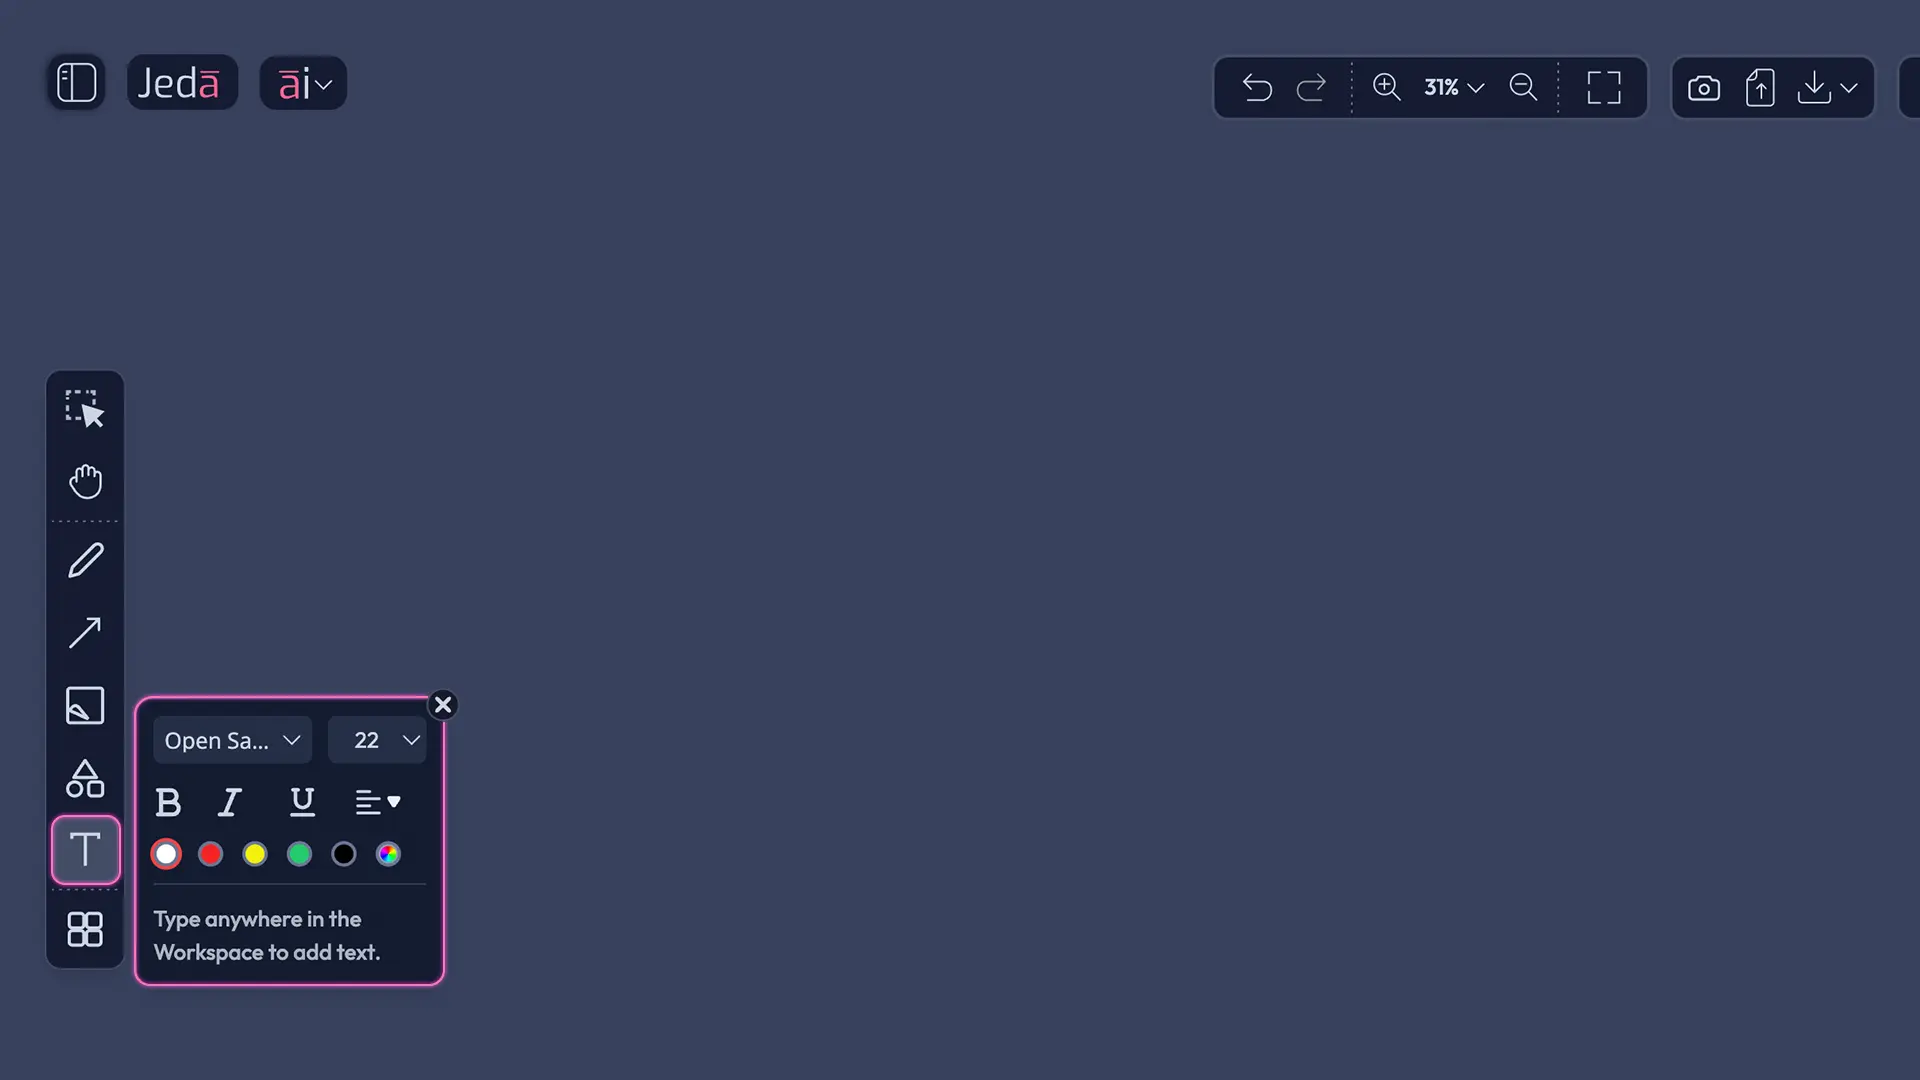
Click the Text tool (left sidebar), then click the canvas to place a text box. A red dashed selection border indicates the active text object. The floating toolbar reveals full formatting: Color, Bold, Italic, Underline, Alignment (left, center, right), Font, Font Size, Duplicate, Settings, and More Options. Useful for structured labels, titles, and annotations where formatting control matters.
Canvas Typing – Type Anywhere, No Tool Switch
Here's the speed move: click anywhere on empty canvas and start typing. No tool switch required. Jeda auto-detects keyboard input and creates a text element at your mouse pointer position. Canvas Typing works even while using other tools—sketch, then quickly add a note, then resume sketching without interruption. Perfect for brainstorming annotations, comments, and rapid ideation. It's faster than Text tool for quick notes but less formatted.
Combining Text Tool and Canvas Typing
Use Text tool for structured, fully formatted labels with specific fonts, sizes, and alignment. Use Canvas Typing for quick comments and annotations alongside drawing. Both create selectable text objects with identical editing capabilities via the floating toolbar.
Components Library – Pre-Built Elements
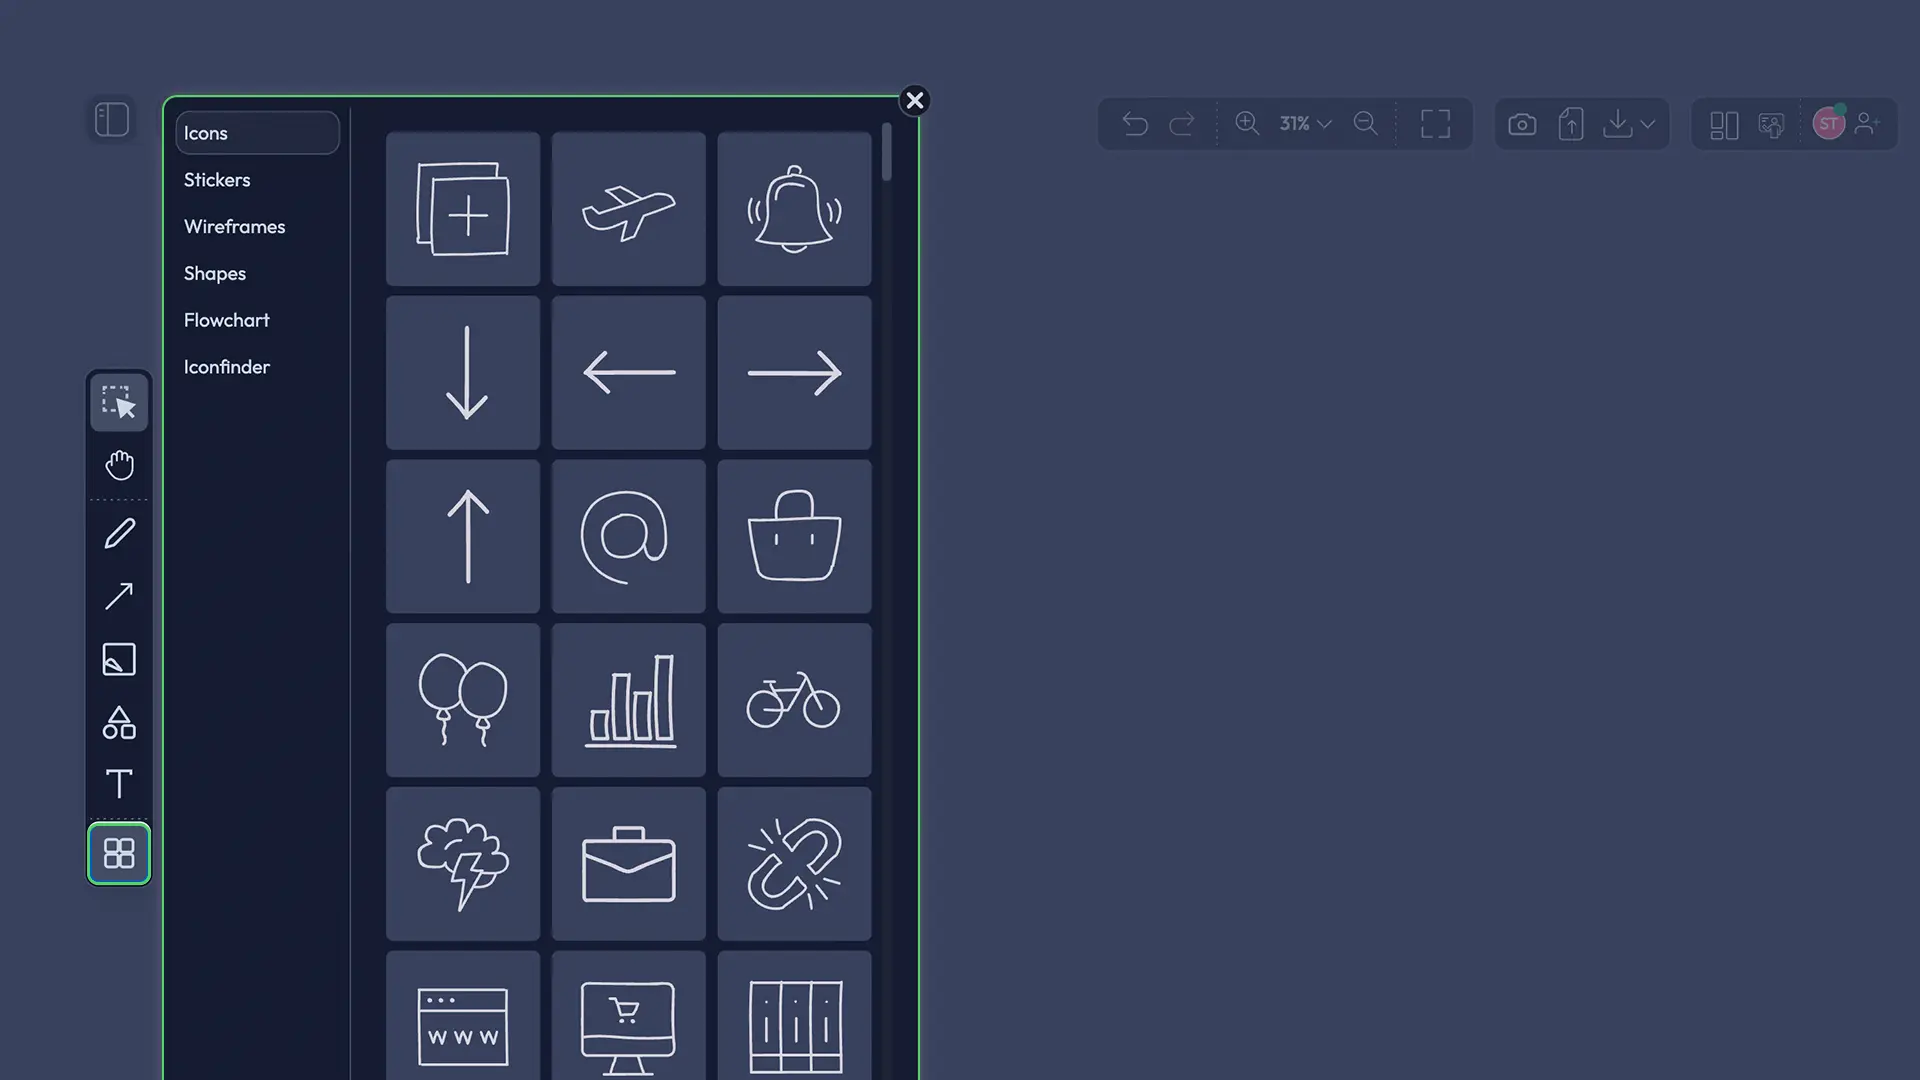
The Components library is a rich collection of pre-drawn elements organized into six categories. Instead of sketching icons or flowchart symbols from scratch, click to place them instantly. Thousands of pre-built elements accelerate diagram creation. The Components library is one of Jeda's strongest differentiators—it combines manual precision with speed.
Icons – Hand-Drawn Style Icons
Arrows, objects, symbols, and visual markers all in hand-drawn aesthetic (matching Jeda's visual style). Searchable library. Quick placement for visual richness without manual drawing. Use Icons for: process flows, category labels, visual cues, emphasis markers, and directional indicators. Save sketching time on complex icon libraries.
Stickers – Decorative Elements
Personality and visual warmth. Emoji-like markers, celebration elements, thematic graphics. Searchable and varied styles. Use Stickers for: team collaboration markers, mood indicators, celebratory elements, and adding personality to otherwise formal diagrams.
Wireframes – Pre-Built UI Components
Mobile and web UI layouts, headers, buttons, cards, navigation bars, form fields. Useful for: UX mockups, app flow diagrams, interface design prototypes, and screen layout planning. Faster than manual sketching for interface design work.
Shapes – Additional Shape Elements
Geometric and decorative shapes beyond the basic four (rectangle, circle, ellipse, triangle). Complements the Shape tool. Useful for: backgrounds, visual partitions, thematic elements, and decorative borders.
Flowchart – Standard Symbols
Decision diamonds, process boxes, terminators, data storage, connectors, and other flowchart notation. Standard ISO/ANSI symbols. Useful for: process mapping, decision trees, system diagrams, and algorithm visualization. Integrates seamlessly with Arrow/Line tool for connections.
Iconfinder Integration – Search and Browse External Icons
Direct access to thousands of icons from Iconfinder library within Jeda's UI. Search by keyword, browse categories, and click to place directly on canvas. Expands icon options far beyond the hand-drawn set. Iconfinder integration is a professional tool for design-heavy workflows.
Workflow: Placing Components
Click the Components tool (puzzle icon, bottom of left sidebar). A panel opens showing six category tabs. Scroll through thumbnails or use the search bar. Click any thumbnail to place on canvas. Resize and edit with floating toolbar or canvas controls. Move with Pan tool as needed. One-click simplicity for complex visual elements.
Workflow and Best Practices
Pre-Set Before Placement
This is the efficiency principle. Before clicking the canvas, configure stroke color, fill color, thickness, shape type (for Smartshape), border style, and any other property in the left sidebar settings panel. These settings apply to all subsequent objects until you change them. More efficient than creating an object and then editing. The floating toolbar is for fine-tuning after placement, not primary configuration.
Building Diagrams Quickly
Combine tools for speed:
- Smartshape for labeled boxes (flowcharts, org charts, matrices, labeled decision trees)
- Components → Flowchart for connectors and standard symbols
- Arrow/Line for custom connections between shapes
- Canvas Typing for quick annotations alongside shapes
- Shape for visual separation and background layers
This multi-tool approach turns diagram creation into a fast, structured workflow.
Annotation and Presentation
- Pen + Brush for markup and emphasis
- Laser Pointer for temporary highlights (presentations, Follow Me mode)
- Text tool for formal, structured labels
- Canvas Typing for quick notes and annotations
Layer these approaches depending on your use case. For live presentation, Laser Pointer shines. For static diagrams, Text tool + Canvas Typing cover most needs.
Pro tip: Pre-set your Pen tool to Brush mode, set a highlight color (yellow, green, or orange), and bump thickness to 8–12px. Now you have a ready-to-go highlighter without configuration mid-workflow.
FAQ
- What's the difference between Smartshape and Shape?
- Smartshape includes an embedded text field—use it for labeled diagrams (flowcharts, org charts, annotated boxes, labeled matrices). Shape is freeform without text—use it for sketching, backgrounds, or decorative elements. Both are customizable with color, borders, and fill. Use the Text tool separately to label Shape objects if needed.
- How do I use Auto Shape in the Pen tool?
- Auto Shape automatically converts hand-drawn lines into perfect shapes. First, enable Auto Shape in Workspace Settings. Then, use Pen mode to draw a line, circle, rectangle, square, oval, or diamond in one continuous stroke. Jeda detects the shape and transforms it into clean geometry while retaining hand-drawn aesthetic with pressure simulation. Extremely fast for structured diagrams without losing artistic feel.
- Can I type without switching to the Text tool?
- Yes. Canvas Typing lets you click anywhere on empty canvas and start typing—no tool switch required. Jeda auto-detects keyboard input and creates a text object at your mouse pointer position. Works even while using other tools. Perfect for annotations, brainstorming notes, and rapid ideation alongside drawing or diagramming.
- What's the Laser Pointer mode used for?
- Laser Pointer is a temporary highlight in the Pen tool that fades after a few seconds. Ideal for presentations and Follow Me mode to draw attention to specific areas without permanently marking the canvas. Unlike Pen and Brush, Laser marks don't persist—useful for live demos, facilitation, and interactive walkthroughs where you want emphasis without visual clutter.
- How do I draw straight lines or connect objects?
- Use the Arrow/Line tool. Select Arrow for connections with arrowheads, or Line for simple connectors. Pre-set stroke color and thickness in left sidebar, then click start and end points on the canvas. Drag for curved connectors; click for straight lines. Useful for flowcharts, process diagrams, and relationship mapping. Arrows/lines are selectable objects with floating toolbar for editing.
- Where do I find the Components library?
- Click the Components tool in the left sidebar (puzzle icon at the bottom). A panel opens showing six category tabs: Icons, Stickers, Wireframes, Shapes, Flowchart, and Iconfinder. Scroll through thumbnails or search by keyword. Click any element to place on canvas. Thousands of pre-built elements available for instant diagramming.
- Can I customize the border style of shapes?
- Yes, with Smartshape. In the left sidebar settings, set Border Type (solid, dashed, dotted), Border Thickness (slider), Border Roundness (softer corners), and Border Color (7 presets + custom picker). Configure before placement. Use floating toolbar for quick tweaks after placement. Shape tool has fewer border options—Smartshape is the customization powerhouse.
- What's the fastest way to create a flowchart?
- Combine tools: 1) Select Smartshape, set shape type to rectangle, and place labeled boxes. 2) Use Components → Flowchart for decision diamonds and connectors. 3) Use Arrow/Line to connect boxes manually if needed. 4) Canvas Typing for quick annotations. This hybrid approach combines the speed of pre-built symbols with the precision of manual placement.
- How do I move around the canvas without selecting objects?
- Use the Pan tool (hand icon in left sidebar). Click and drag to move your view. Alternatively, hold Spacebar and drag with any tool active to temporarily pan. Useful on large canvases or when zoomed in. Pan doesn't select or edit objects—pure navigation to position your view.
- Can I set shape properties before placing them?
- Yes, always. Every tool (Pen, Smartshape, Shape, Text, Arrow/Line, Components) has left sidebar settings. Configure color, thickness, shape type, fill, and border *before* clicking canvas. Properties apply to all subsequent objects until you change settings. More efficient than edit-after-place workflow, saving time on repeated configurations.
- What's the difference between Pen and Brush modes?
- Pen mode is standard freehand drawing with pressure simulation and optional Auto Shape detection. Brush mode is thicker, more opaque, for bold marking and highlighting. Both use same color/thickness pre-sets. Eraser mode removes strokes; Laser Pointer creates temporary fading highlights. All four modes live in the Pen tool—switch between them via left sidebar settings.
- Can I search for specific icons in the Components library?
- Yes. Within the Components panel, use the search bar or scroll through categories. Icons category includes hand-drawn arrows and symbols. Iconfinder integration lets you search thousands of icons directly in Jeda—type a keyword and results appear instantly. Click to place any result on canvas. Massively expands design possibilities beyond the hand-drawn set.
Master Your Canvas
You've now learned eight core tools—Select, Pan, Pen (with four modes), Arrow/Line, Smartshape, Shape, Text, and Components—plus Canvas Typing's speed advantage. The principle is consistent: configure in the left sidebar before placement, then refine with the floating toolbar after. Jeda.ai's Visual AI Whiteboard is built for speed and precision, combining manual control with pre-built libraries and intelligent shape detection. With 150,000+ users relying on these canvas tools daily, you're learning an industry-standard approach to visual diagramming and annotation.
Ready to go deeper? Explore Jeda.ai's 300+ strategic frameworks and AI Recipes to accelerate your visual analysis, decision-making, and team collaboration. Canvas tools are your foundation—AI Recipes multiply their power.
Unlock Jeda's AI-Powered Workflows
Master canvas tools and combine them with 300+ AI Recipes for rapid brainstorming, diagramming, and strategic analysis.
Explore AI Recipes