Why Real-Time Collaboration Matters
The Problem with Async-Only Teamwork
Ever tried explaining a complex analysis to your team over email? You spend an hour building a SWOT analysis, export it as a PNG, attach it, and send. Three hours later, feedback trickles in. "Can you move the Threats quadrant?" "What if we added market risk here?" "Who made that decision?" You're back in your spreadsheet, making changes in isolation. Your team's thinking stays fragmented.
Most collaboration tools solve part of the problem. They give you cursors, comments, and version history. But here's what they don't solve: shared reasoning. When you use AI to build frameworks, your teammates don't see the thinking that created them. You prompt the AI. You get a response. You edit it. Your team sees the final matrix—but they miss the entire decision trail. That's where context gets lost.
How Jeda.ai Changes the Game
Jeda.ai's AI Workspace is built for teams that think together, not just work together. Here's the difference:
When your team collaborates in Jeda.ai, every collaborator sees every AI prompt and response in real-time. You use Multi-LLM Agent to synthesize competitor research. Your teammate sees exactly which models you ran and what each one recommended. You use Data Insight to pull trends from a spreadsheet. Everyone sees the data, the analysis, and the insights—all in one shared chat history.
This isn't just collaboration. It's shared reasoning. Combined with Creator Heatmap (which shows who built what with color-coded attribution) and Follow Me mode (synchronized presentations), you've got a fundamentally different way for teams to think visually together.
Over 150,000 professionals now use Jeda.ai as their AI Workspace. Teams report faster consensus-building, clearer accountability, and fewer "lost context" moments when collaborating across time zones.
Let's show you how to unlock this power.
Getting Started: Sharing Your Workspace
Three Ways to Invite Collaborators
There's no single "right" way to share a workspace. Jeda.ai gives you three options, each designed for different scenarios. Pick the one that fits your team.
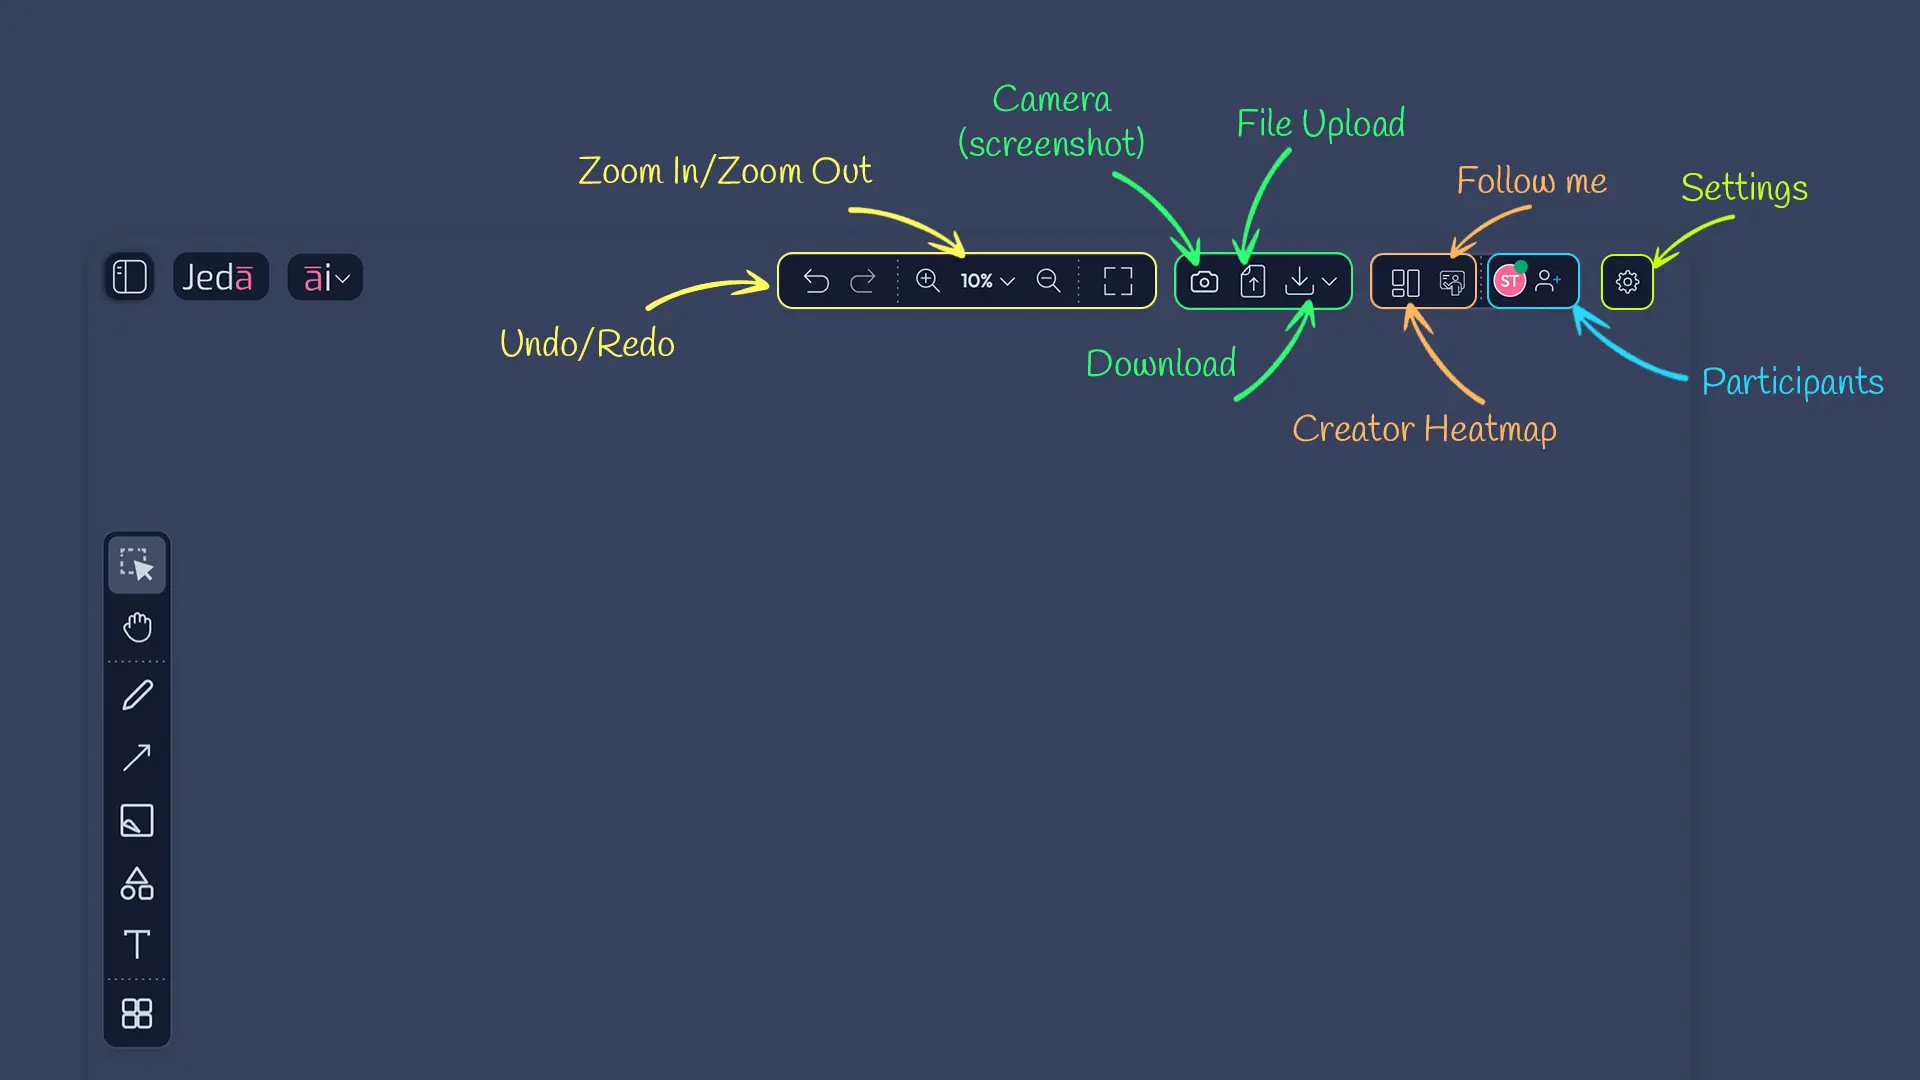
Option 1: Workspace URL Sharing (Easiest for Quick Sharing)
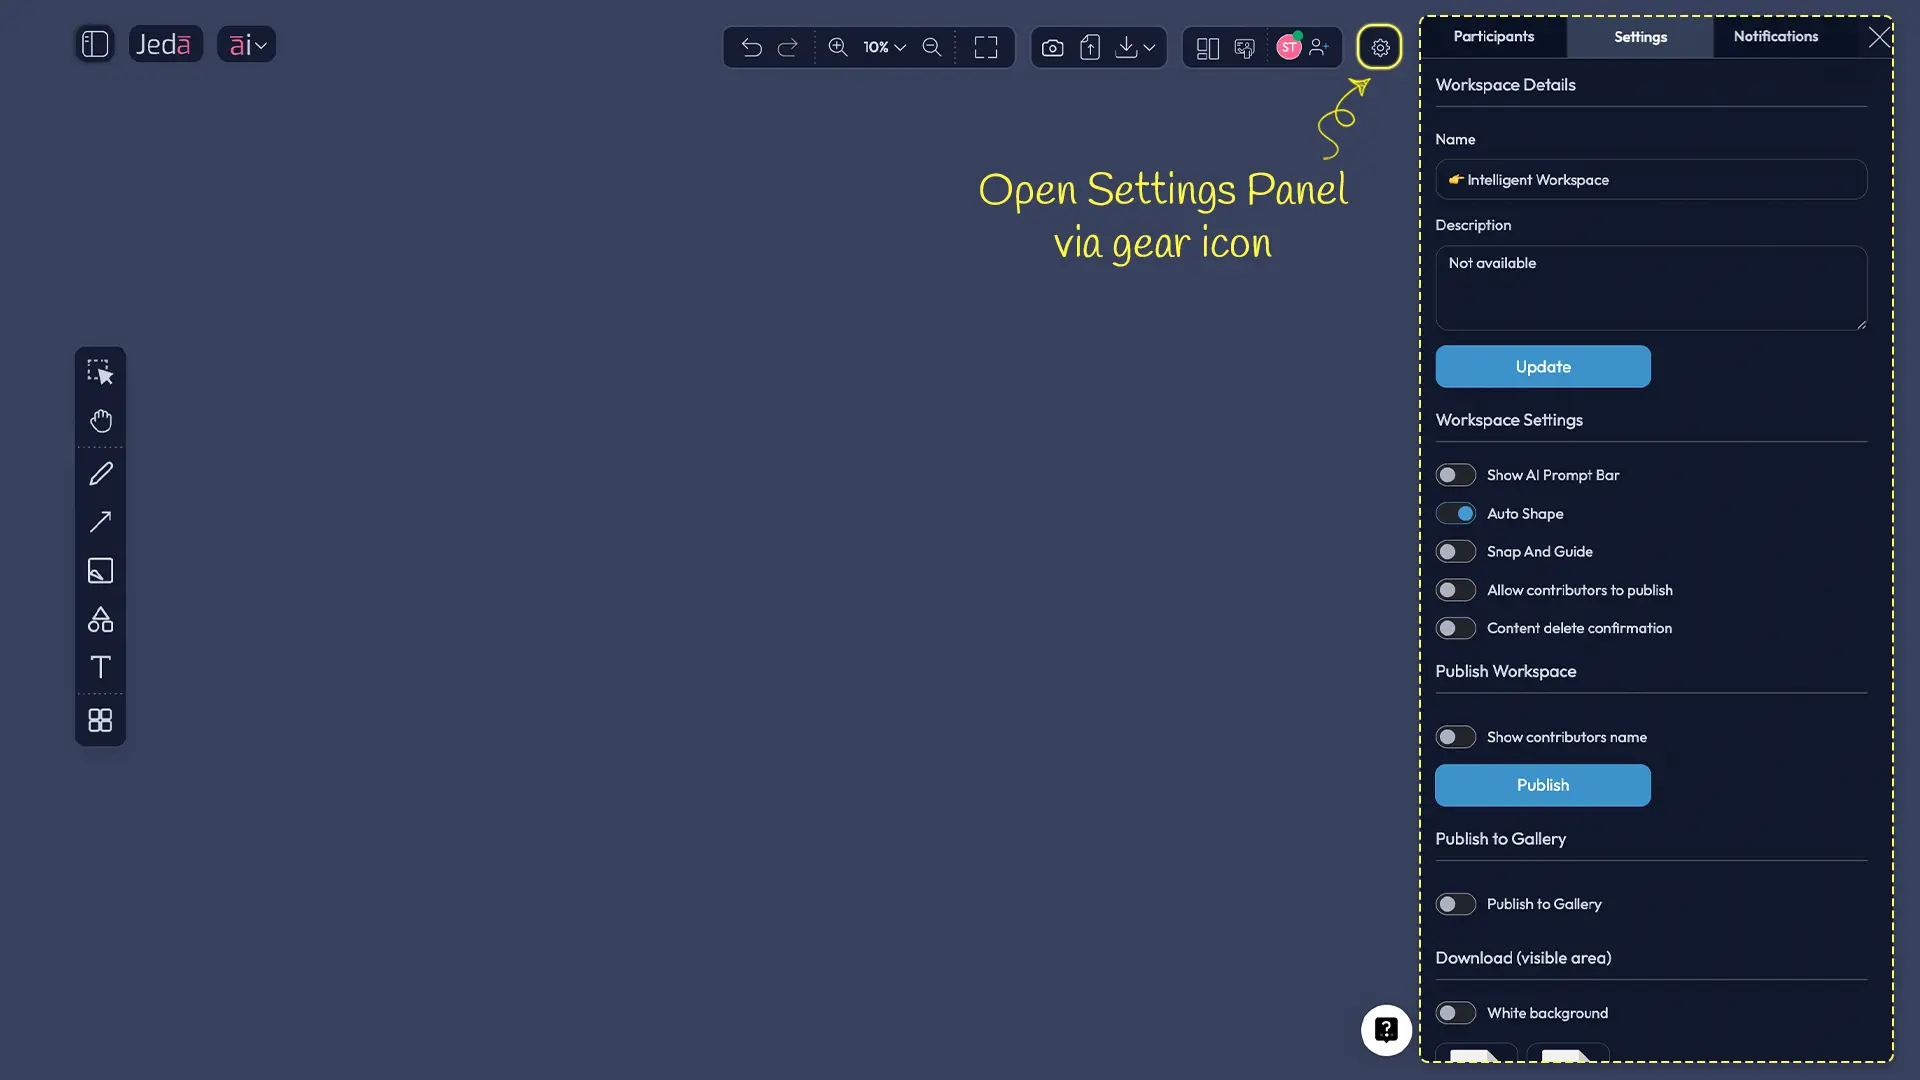
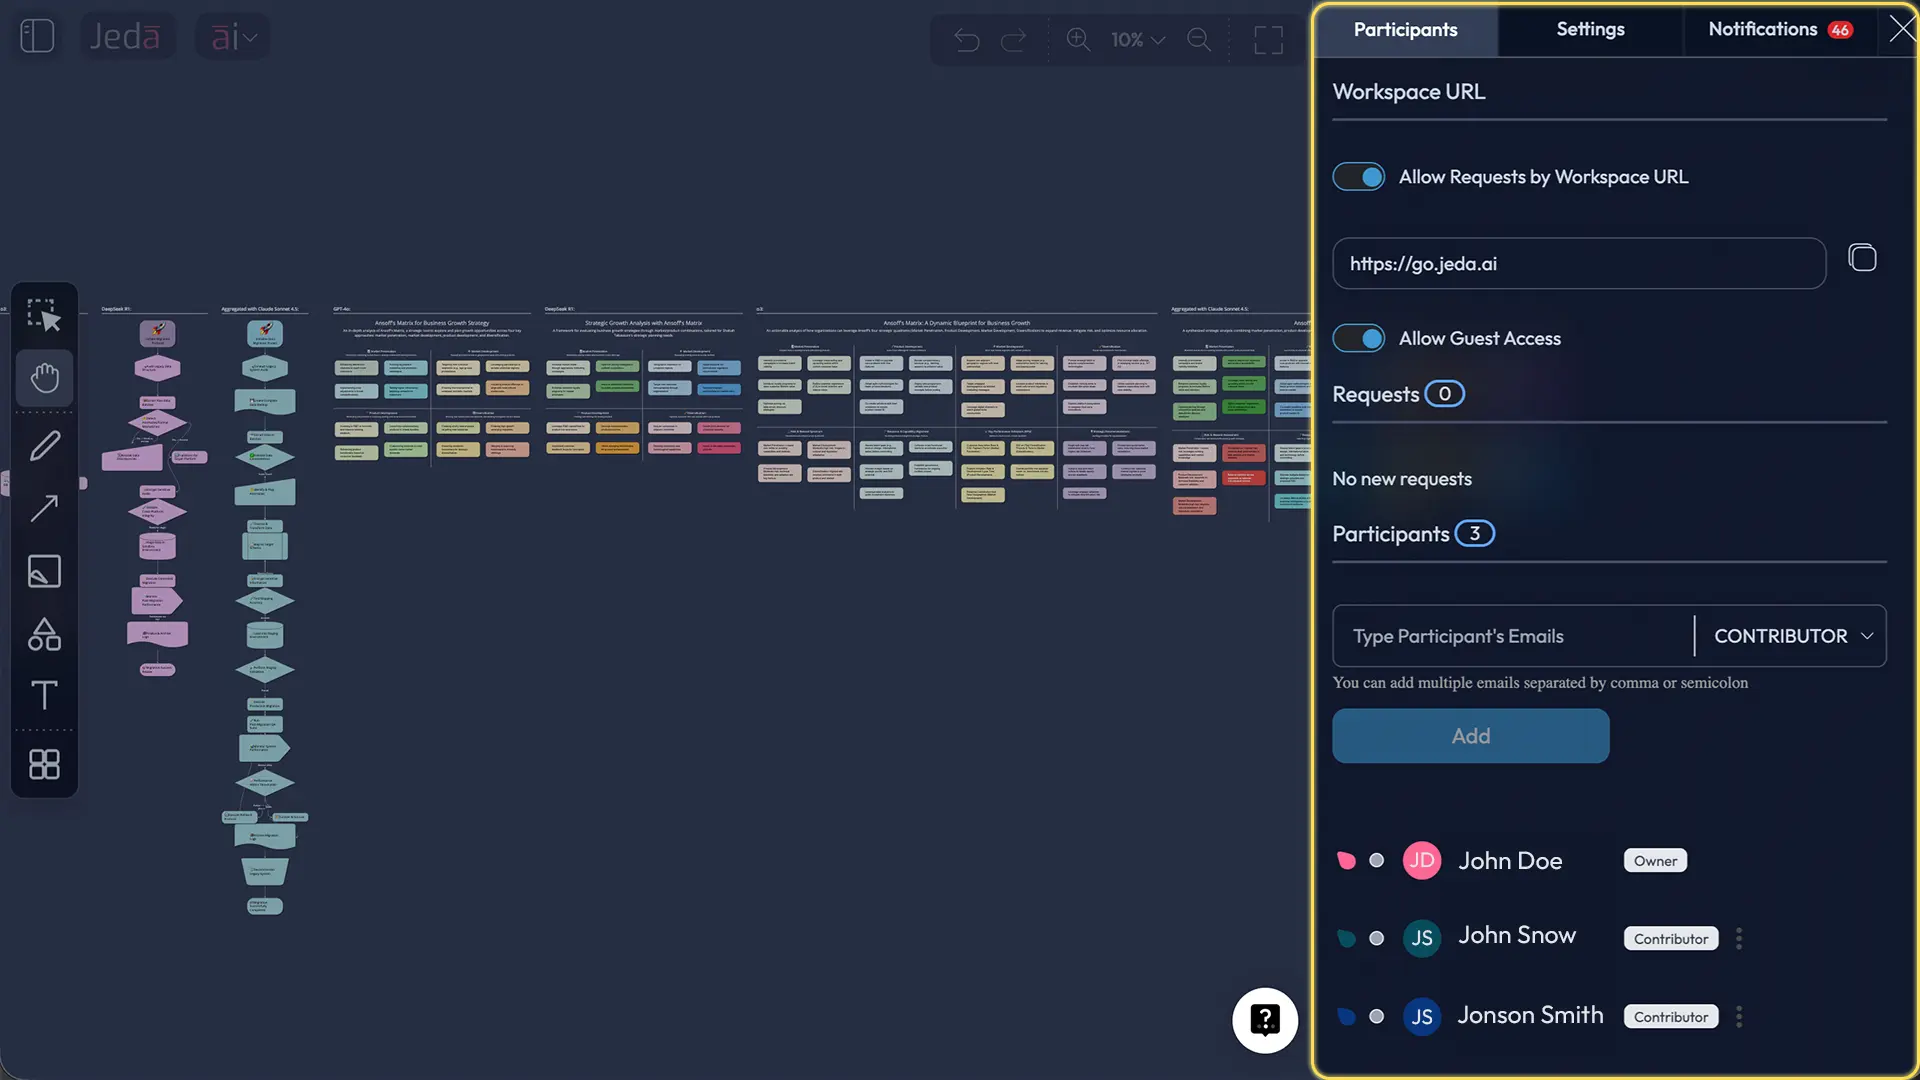
In the top-right toolbar, click Settings (⚙️). Open the Participants tab. You'll see your unique Workspace URL—a shareable link (e.g., https://go.jeda.ai/aqU4KqN3). Copy it. Send it via Slack, email, or Teams.
By default, anyone with the link can view your workspace but cannot edit. You control this with two toggles:
- Allow Requests by Workspace URL: When enabled, link-receivers can request to join. You approve or deny from the Participants tab.
- Allow Guest Access: When enabled, non-registered users see your workspace without signing up. Perfect for quick reviews or external stakeholders.
Option 2: Email Invitations with Role Assignment (Best for Permission Control)
In the Participants tab, you'll see an email input field. Type one or multiple email addresses (comma or semicolon separated). Before you hit Add, select a role from the dropdown: Contributor or Viewer.
Then click Add. Jeda sends an email invitation to each address. When they accept, they join with the exact permission level you chose. No ambiguity. No surprises.
This is ideal when you need precise control. A designer needs edit access to your wireframe? Invite as Contributor. An executive needs a read-only review? Invite as Viewer.
Option 3: Guest Access (For External Collaborators)
Enable the Allow Guest Access toggle in the Participants tab. Anyone with your workspace URL can view as a guest—no login required. They see everything but can't edit.
Great for presenting to clients, getting feedback from external reviewers, or onboarding new hires who aren't yet on the Shifu team plan.
Understanding Participant Roles
Jeda.ai uses a simple three-role system. Here's what each one can do:
Owner — That's you (or whoever created the workspace). Owners have complete control: invite/remove participants, change roles, toggle permissions, delete content, archive the workspace, modify workspace settings. There's always at least one Owner. You can't demote yourself, but you can promote another Contributor to Owner if needed.
Contributor — The workhorses. Contributors can create, edit, delete, and extend any visual on the canvas. They can use every command, generate with AI, use the Chat History, and collaborate fully. If you're building a SWOT matrix together, Contributor is the role for your teammates.
Viewer — Read-only access. Viewers see everything—every matrix, every mindmap, every prompt and response in Chat History. But they can't create, edit, or delete. They can add comments (in the future; currently limited), but they can't change the canvas. Perfect for stakeholders who need visibility without decision-making power.
Bonus: Grouped Objects & Creator Color — When multiple people edit the same visual, smart shapes inside are tagged with creator information. The Creator Heatmap (more on this later) shows who made what via color coding. Even inside a complex matrix, you can see which quadrant was added by which teammate.
Managing Access & Permissions
Owner Role: Full Control
As the workspace Owner, you have absolute authority. In the Participants tab, you'll see a list of all collaborators. Next to each name:
- Role dropdown — Change from Contributor to Viewer (or vice versa) instantly. No need to remove and re-invite.
- Mute toggle — Silence their cursor/mouse pointer from your view (more on this below).
- Remove button — Boot them out immediately. They lose access. Their contributions stay on the canvas.
Owners also control workspace-level settings: Publish to Gallery, Allow Contributors to Publish, Auto Shape detection, Snap and Guides. You can also enable Content Delete Confirmation, which requires a confirmation dialog before anyone (including you) deletes content. Smart for preventing accidents.
Contributor Role: Build and Edit
Contributors can't invite people or change roles, but they can do everything else. Create matrices. Generate flowcharts. Run Data Insight on uploaded CSVs. Use Multi-LLM Agent. Extend visuals with AI+. Edit any shape, text, or connector on the canvas.
And critically: Contributors see the full Chat History. Every prompt, every AI response, every decision trail. This is where the "shared reasoning" magic happens.
If a Contributor wants to publish their work to the Jeda Gallery, they can—if the Owner has enabled "Allow contributors to publish" in Workspace Settings.
Viewer Role: See-Only Access
Viewers get the full picture without the pen. They see:
- Every visual on the canvas (matrices, flowcharts, wireframes, everything)
- The complete Chat History (every AI prompt and response)
- Creator Heatmap (who built what)
- Real-time collaborator cursors (if cursors are unmuted)
But they can't create new content, edit existing content, delete anything, or run new AI prompts. They're observers with deep context.
This is perfect for executives reviewing strategy, clients approving designs, or auditors tracking accountability.
Muting Mouse Pointers for Focus
When three people are editing the same canvas, seeing everyone's cursor can feel chaotic. That's why Jeda has Mute Mouse Pointer—a per-user toggle in the Participants tab.
Click the mute icon (speaker with X) next to any collaborator's name. Their cursor disappears from your view. You still see their edits in real-time, but their movements don't distract you. They don't know they're muted; it's your preference, not theirs.
Great during focused work sprints when you want clean sightlines. Everyone's editing, but you're only watching the people you care about.
The Shared AI Chat History: Your Reasoning Trail
What Is Shared Chat History?
Here's a feature that sets Jeda.ai apart: every AI prompt your team sends appears in a single shared chat history. Not separate chats per user. Not asynchronous feedback threads. One unified record of every AI decision your team made.
Open the Chat History panel (💬 icon in the Prompt Bar, bottom-right). Scroll through and you'll see a chronological feed:
- Timestamp of each prompt
- Which teammate sent it (with their avatar)
- The exact prompt they wrote
- Which AI model was used
- The full AI response
- Any errors or clarifications
Collaborators can see this history in real-time. The moment one person sends a prompt, everyone else sees it within seconds.
Why Every Collaborator Sees Every AI Prompt
Traditional AI tools treat AI as a black box. You ask ChatGPT a question. You get an answer. Your team doesn't see the reasoning inside.
Jeda.ai flips this. In a true AI Workspace, transparency is the default. Why?
Accountability — If the AI synthesized market data into your SWOT analysis, your team should see exactly how it did that. No surprises. No "where did this insight come from?" moments.
Learning — Your teammates learn by seeing how you prompt the AI. They see what works, what doesn't, and can improve their own prompts in the next iteration.
Consensus — When everyone sees the same AI reasoning, consensus happens faster. Instead of debating the decision, you're debating the data and reasoning the AI used. That's a conversation you can win.
Reproducibility — Months later, if someone asks "how did we get that insight?", you can scroll Chat History and see the exact prompt, model, and response. Full traceability.
Real-World Example: Building a SWOT Together
Imagine your product team is analyzing your SaaS product's competitive position. You're in Jeda.ai with a designer, two product managers, and an analyst.
9:00 AM — You open the workspace and use Matrix command: "Create a SWOT for our AI analytics platform, focusing on market position vs. Tableau and Looker." Shared Chat History logs it.
9:05 AM — Your analyst uploads Q1 customer feedback data to the workspace and runs Data Insight: "Analyze this customer feedback for themes about our strengths and weaknesses." Chat History shows the data, the prompt, and the AI-generated insights.
9:12 AM — Your product manager sees the insights and refines the SWOT. She adds a new Opportunities cell: "Market shift to real-time analytics." Uses AI+ (extend button) to expand that cell with related insights.
9:20 AM — Your designer is building wireframes in a separate canvas. He's working solo, but he can glance at the Chat History and see exactly what Opportunities the team identified. When he designs the feature roadmap, it's grounded in the shared AI reasoning.
9:30 AM — You toggle Creator Heatmap on. All the Strengths are colored pink (your contribution), Weaknesses are blue (analyst's), Opportunities are green (PM's), Threats are orange (gathered from a web search by the PM). Everyone can see instantly who contributed what.
4:00 PM — Your VP of Product joins the call. You enable Follow Me mode. All their collaborators follow your viewport as you walk through the SWOT, the supporting data, and the AI reasoning. You stop at each quadrant, highlight the Chat History prompts that built it, and they see the thinking process, not just the output.
That's a true AI Workspace. Shared reasoning. Full transparency. No lost context.
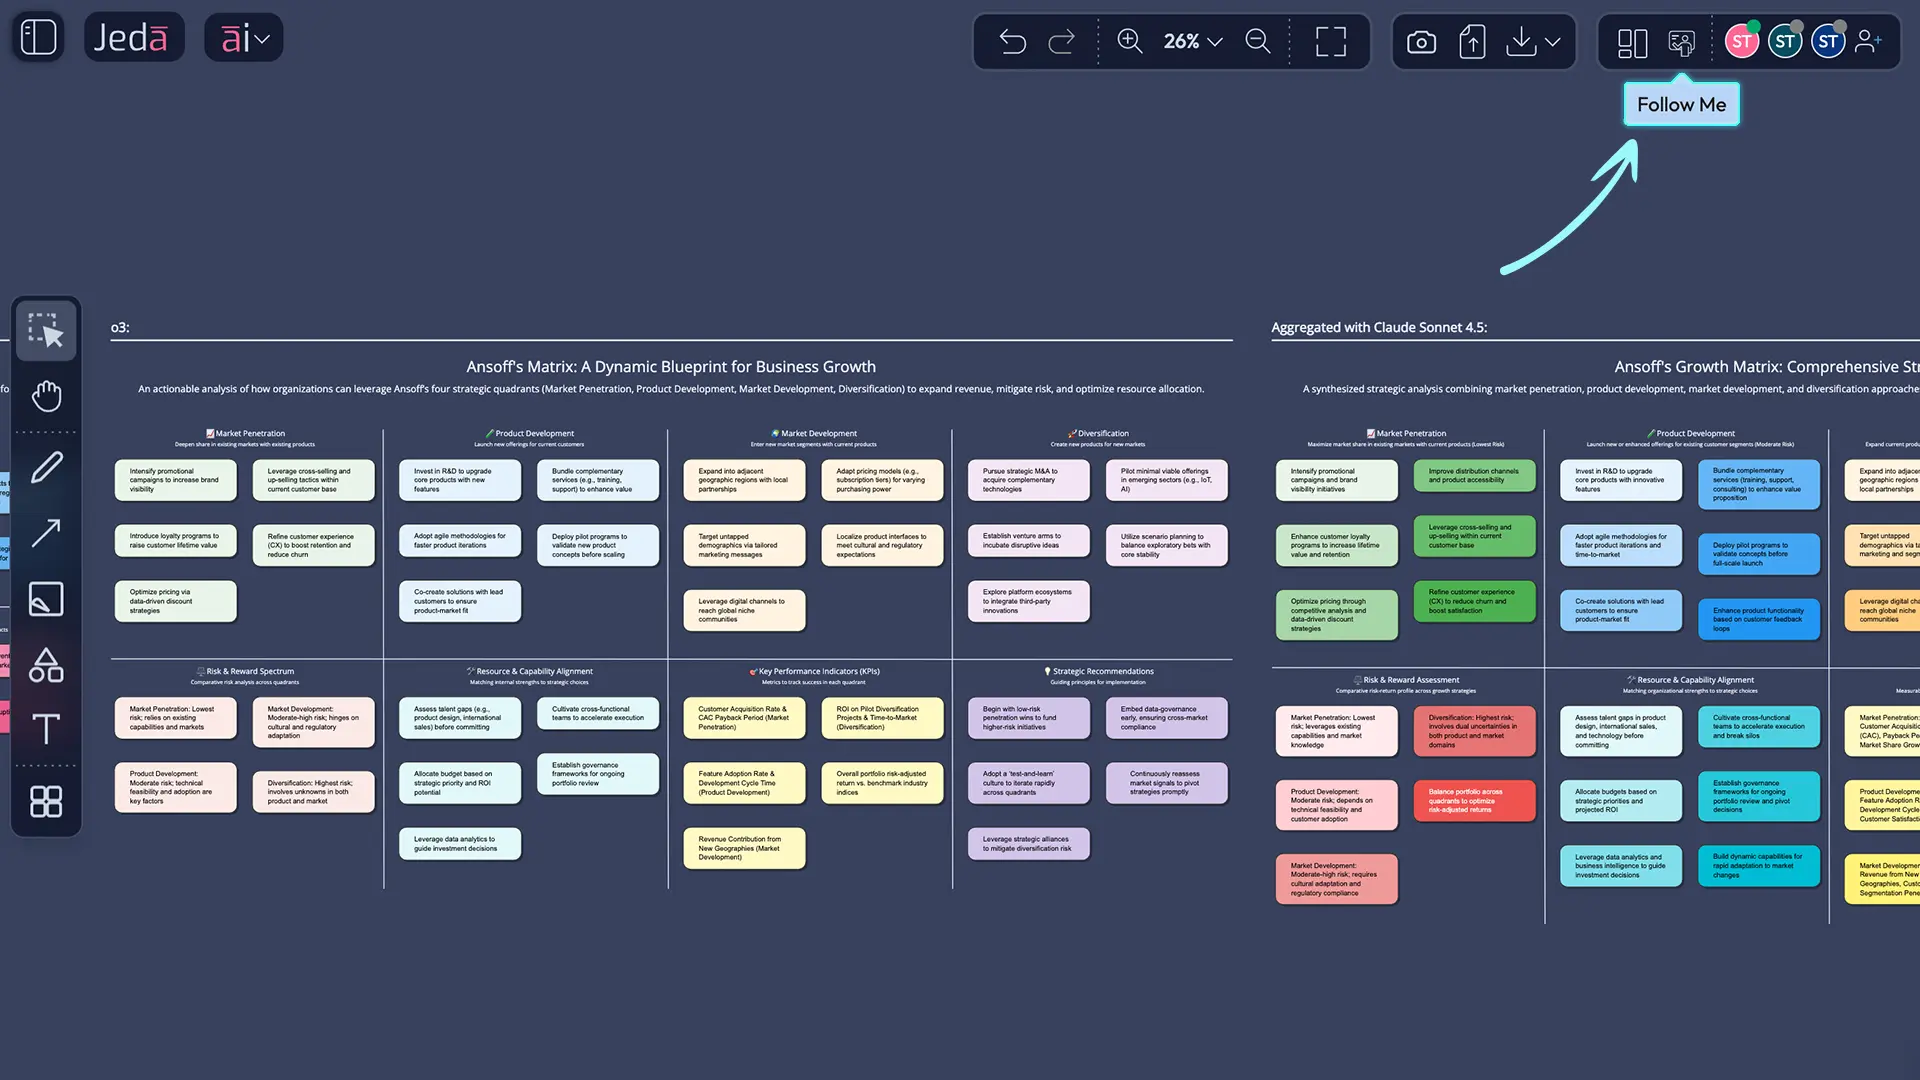
Presenting with Follow Me Mode
What Is Follow Me Mode?
Follow Me is your secret weapon for remote presentations. When you activate it, all collaborators' viewports lock to yours. As you pan the canvas, their screens pan with you. As you zoom in on a detail, they zoom in. As you move your cursor, they see it. You're not just presenting a static image. You're guiding them through your thinking in real-time.
Traditional presentations use screen shares. Everyone stares at a rectangle on their screen. With Jeda.ai's Follow Me mode, everyone's canvas is in sync. You can invite them to zoom in on a specific cell, pan to a related visual, and they follow effortlessly.
It's like leading a group through a museum, pointing out details as you go.
How to Activate Follow Me
It's one button. In the top-right toolbar, find the Follow Me button (looks like a play icon or "►" with a broadcast symbol). Click it.
A small indicator appears at the top of the workspace: "Follow Me active." Your collaborators see a notification: "[Your Name] has activated Follow Me mode." Their viewport now locks to yours.
To exit Follow Me, click the button again. Everyone's viewport returns to their independent control. They can now navigate freely.
Pro tip: Turn off Follow Me when you want questions or side conversations. Turn it back on when you're revealing a new section of analysis.
Best Practices for Presentations
Pacing Your Reveal
Don't jump around the canvas too fast. Your teammates are following your cursor and viewport. If you zoom in, pan left, zoom out, and pan down in 10 seconds, they get disoriented. Pause for a few seconds after each movement. Let them absorb the detail before moving to the next section.
A good rhythm: 10 seconds per visual, 15 seconds for complex matrices, 5 seconds for simple callouts.
Handling Questions During Follow Me
Your teammate asks, "What if we moved this to Threats instead of Weaknesses?" Instead of breaking Follow Me and navigating manually, stay in Follow Me and pan to that cell. Highlight it with a cursor pause or arrow annotation. Let them see the change in context.
If someone wants to explore a side question, you can temporarily exit Follow Me, let them navigate independently, then re-engage. They understand it's a quick sidebar.
Exiting Follow Me Gracefully
End your presentation strongly. Do a final pan to a key visual (maybe your Opportunities quadrant with the biggest win). Let them soak in that image for 5-10 seconds. Then say, "You can now explore on your own" and click the Follow Me button to disable it. Don't just drop them without warning—it feels jarring.
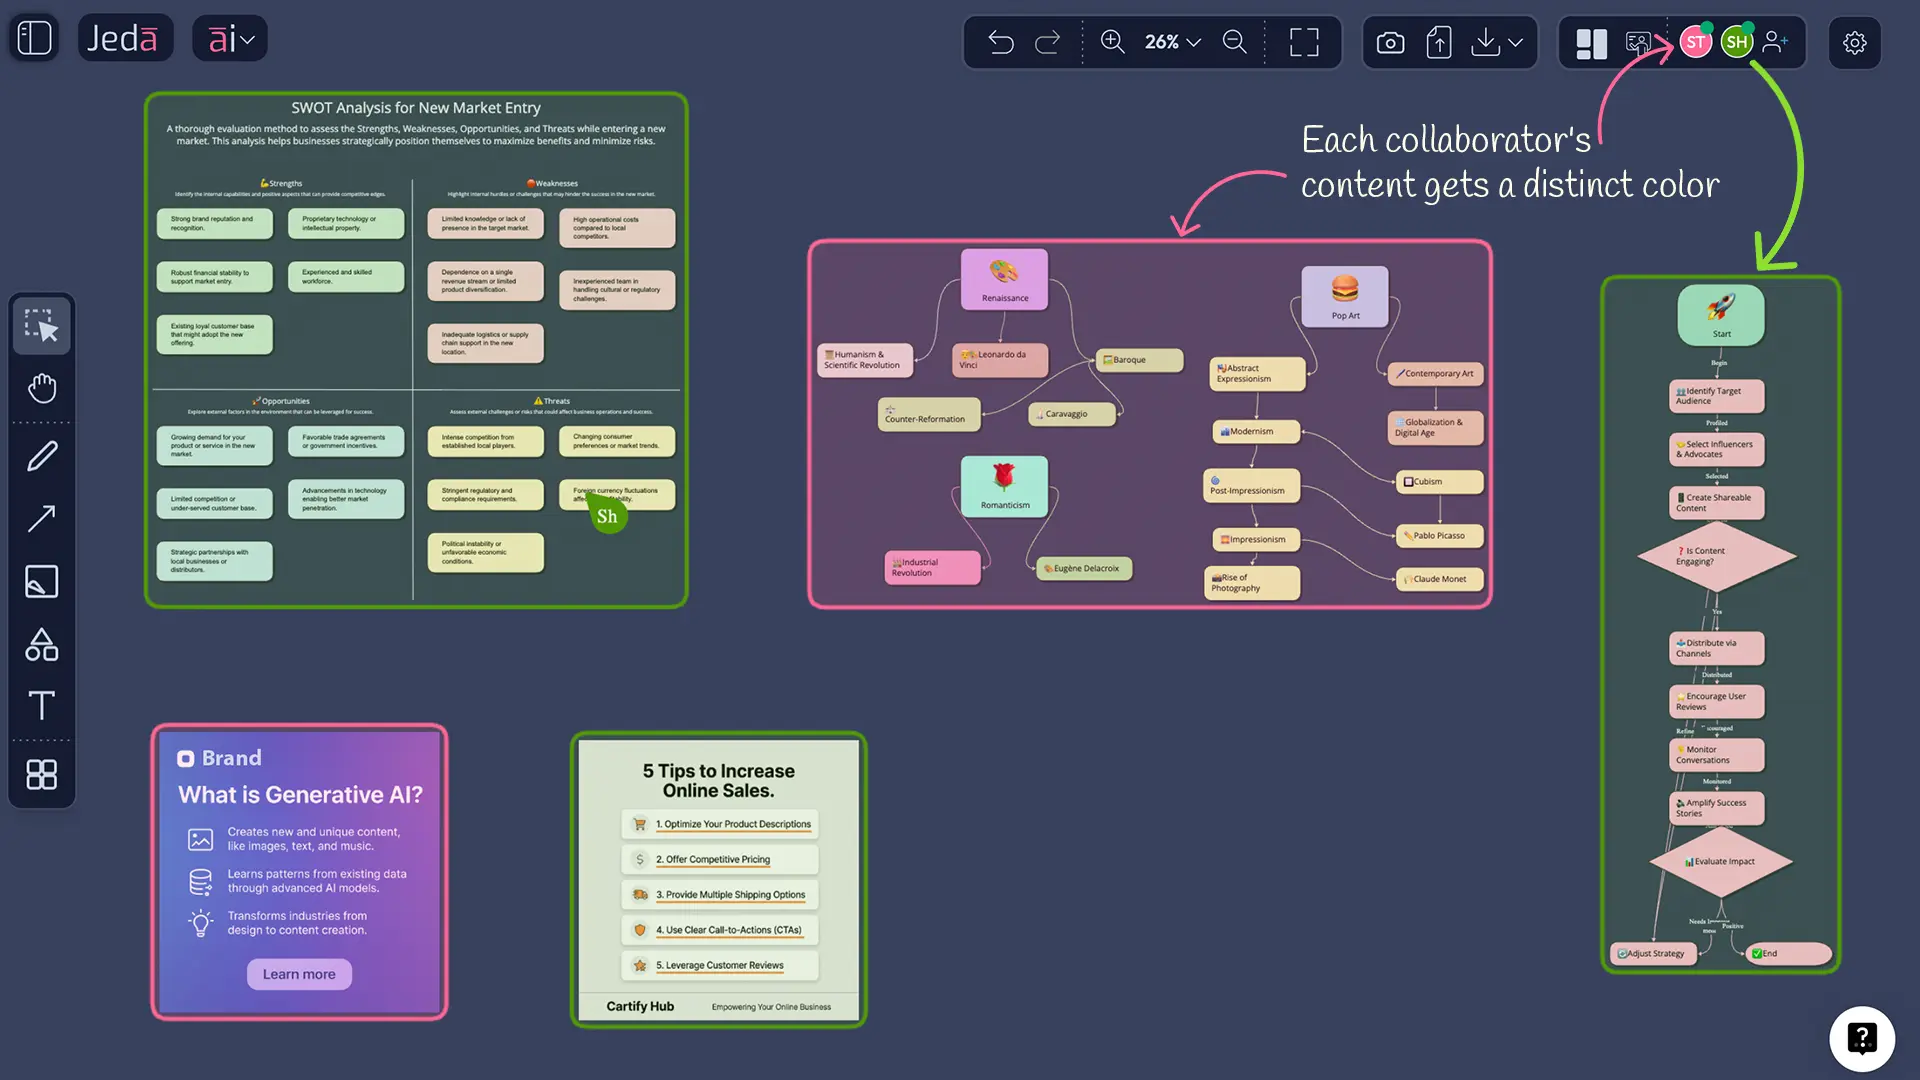
Creator Heatmap: Attribution at a Glance
Understanding the Color-Coded Overlay
Enable Creator Heatmap and the canvas transforms. Every smart shape—every matrix cell, every mindmap node, every flowchart box—gets a colored border. The color matches the creator.
You might see pink shapes (created by you), blue shapes (created by teammate A), green shapes (created by teammate B), and orange shapes (grouped objects, inherit the group creator's color).
Grouped objects are key here. If you bundle five shapes together, the entire group gets the group creator's color. So if your teammate grouped a Strengths quadrant, the whole quadrant shows her color, even though individual cells might have different creators.
The color legend doesn't appear on screen, but you can hover over a shape and the creator's name pops up.
Using Heatmap for Accountability
In consulting or product work, accountability matters. Who decided to add that new feature? Whose analysis led to that insight?
Toggle Creator Heatmap on during sync meetings. Point to the pink section: "That's the customer research I synthesized." Point to the blue section: "That's the competitive analysis Jamie pulled together." Everyone sees the contribution. It builds ownership and reduces the dreaded "I didn't know we were doing that" feeling.
It's also great for code review culture but applied to visual thinking. No more wondering who's responsible for which decision.
Pro tip: Use Creator Heatmap during Follow Me presentations. As you walk through your SWOT, the color-coded borders tell the story of who contributed what. It's a subtle visual that builds team cohesion.
How Grouped Objects Inherit Creator Color
When you select multiple shapes and group them (via the right-click or toolbar menu), Jeda remembers who created the group. That person's color becomes the group's color. When you ungroup later, individual shapes revert to their original creator colors. The group was just a visual container—the underlying attributions stay intact.
This prevents color chaos. If five people each added cells to a matrix, and then someone groups all those cells, the group doesn't erase individual attribution. Ungroup, and you see the true distribution of contributions.
Participant Management: Adding, Changing Roles, and Removing
Adding New Participants Mid-Project
Your founder just asked to join the project. Or a new contractor came onboard. You don't need to restart the workspace. Just add them.
Go to Workspace Settings → Participants tab. Enter their email. Select a role (Contributor for active builders, Viewer for oversight). Click Add. They get an email invitation and join within minutes.
They see the full workspace—all existing visuals, all existing Chat History. No need to "catch them up" manually. They drop into the context immediately.
Pro tip: Add people as Viewer first if you're unsure about their involvement. Upgrade them to Contributor once their role is clear.
Changing Roles After Invitation
Your Viewer just became a core team member. You need her to contribute. No problem.
In the Participants tab, find her name. Click the Role dropdown next to her name. Change from Viewer to Contributor. Click save.
Instantly, she gains edit rights. She can now create shapes, run AI prompts, and modify existing visuals. No need to remove and re-invite. The transition is seamless.
This happens in seconds. No delay, no confusion.
Removing Participants Safely
A contractor's engagement ends. An employee leaves the team. You need to revoke access.
In the Participants tab, find their name and click the Remove button (trash icon). They're instantly removed from the workspace. They can no longer view, edit, or access anything.
Their contributions stay on the canvas. If they created cells in a SWOT matrix, those cells remain. But they can't see them or modify them anymore. Ownership of their work transfers to the workspace (no longer attributed to them).
Important: Removing someone is instant and irreversible. Make sure before you click remove.
Frequently Asked Questions
- Can I invite someone who doesn't have a Jeda.ai account?
- Yes. Enable 'Allow Guest Access' in Workspace Settings → Participants Tab. They can view as guests without signing up. For email invitations, they'll receive an invite link and can join with or without creating an account.
- What's the difference between Contributor and Viewer roles?
- Contributors can create, edit, delete, and extend visuals. They can run AI prompts and use all commands. Viewers can see everything—the full canvas and Chat History—but cannot create or modify anything. They have read-only access.
- How do I control what guests can see?
- Guests see the entire workspace by default. Jeda.ai uses workspace-level permissions, not granular folder-level access. If you need fine-grained control, use the Viewer role for that person and invite them by email instead of guest link.
- Can I use Follow Me mode if collaborators are on mobile?
- Follow Me works on mobile, but editing during Follow Me is limited. Desktop provides the best experience. Mobile users can follow your viewport and see your cursor, but they won't be able to contribute edits as smoothly.
- Does shared AI chat history show all prompts, including failed ones?
- Yes. Every prompt—successful or failed—appears in the shared chat history, along with the AI response or error message. This full transparency helps teams learn from what worked and what didn't.
- Can I hide the Creator Heatmap from collaborators?
- Yes. Heatmap is a per-user toggle. You can enable it on your screen while your teammates see the canvas without heatmap colors. It doesn't force visibility on others. Everyone can independently turn heatmap on or off.
- What happens to permissions when I promote someone from Viewer to Contributor?
- They instantly gain edit access to all existing content. They can start creating and editing immediately. No need to re-invite or start fresh. It's a seamless role upgrade.
- Can I mute one person's cursor but not another's?
- Yes. In the Participants tab, you can mute/unmute each collaborator's mouse pointer individually. This is your personal preference—the muted person doesn't know they're muted on your screen.
- Is there a limit to how many people can collaborate on one workspace simultaneously?
- No hard technical limit, but performance degrades with 50+ simultaneous collaborators. Recommended: under 20 for optimal real-time experience. For larger teams, consider breaking work into multiple focused workspaces.
- Can archived workspaces still be shared with collaborators?
- No. Once you archive a workspace, it's no longer accessible to collaborators. They'll see it in their 'Archived' folder if they had access before, but it's read-only. Restore the workspace if you want to re-share and collaborate again.
- Does the chat history sync across all collaborators instantly?
- Yes. When one person sends a prompt, all collaborators see the prompt and AI response in real-time (within 1-2 seconds). Chat history is synchronized across all team members immediately.
- How do I know when someone is currently in my workspace?
- Look at the user avatars in the top-right toolbar. A green dot indicates 'online now.' For a full participant list with timestamps, click Workspace Settings → Participants Tab. You'll see all invited members and their online status.
- [1]
Yuan, M. L., & Pu, D. (2023) . “Towards AI-Native Collaboration: Challenges and Opportunities” arXiv preprint.
View Source ↗
Start Collaborating with Your Team Today
Invite teammates to your AI Workspace and build frameworks together with shared reasoning. Over 150,000 professionals use Jeda.ai for real-time visual collaboration. Start free—no credit card required.
Invite Your First Teammate