Why Workspace Settings & Shortcuts Matter
Customize Your Thinking Environment
Jeda.ai is built on a simple idea: everyone thinks differently. Some prefer dark interfaces for long work sessions. Others want keyboard-only workflows. Teams need safety features to prevent accidents. The AI Workspace recognizes this. Workspace settings let you customize your environment to match your thinking style. Whether you're a solo strategist, a product designer, or a consultant leading a team session, the right settings remove friction and unlock your best work.
Settings aren't boring configuration. They're personalization. They're your rules. When you toggle features on and off, you're telling Jeda how you want to work—and the platform listens.
Work Faster with Keyboard Shortcuts
Research shows that users who master keyboard shortcuts work 15-20% faster on repeat tasks. That's not a marginal gain. That's transformative. In one project, it's 30 minutes back. Over a year, it's weeks of recovered time. But the real power of keyboard shortcuts isn't speed alone—it's flow. When your hands never leave the keyboard, your mind never breaks focus. Ideas flow from brain to canvas without interruption.
Jeda.ai's keyboard shortcuts are designed for visual thinking. Create connected nodes with Tab. Duplicate objects in any direction with Cmd+Arrow. Navigate massive canvases with Fit to Screen. These aren't just conveniences. They're thought amplifiers.
Workspace Settings: Configure for Your Workflow
Understanding the Settings Panel
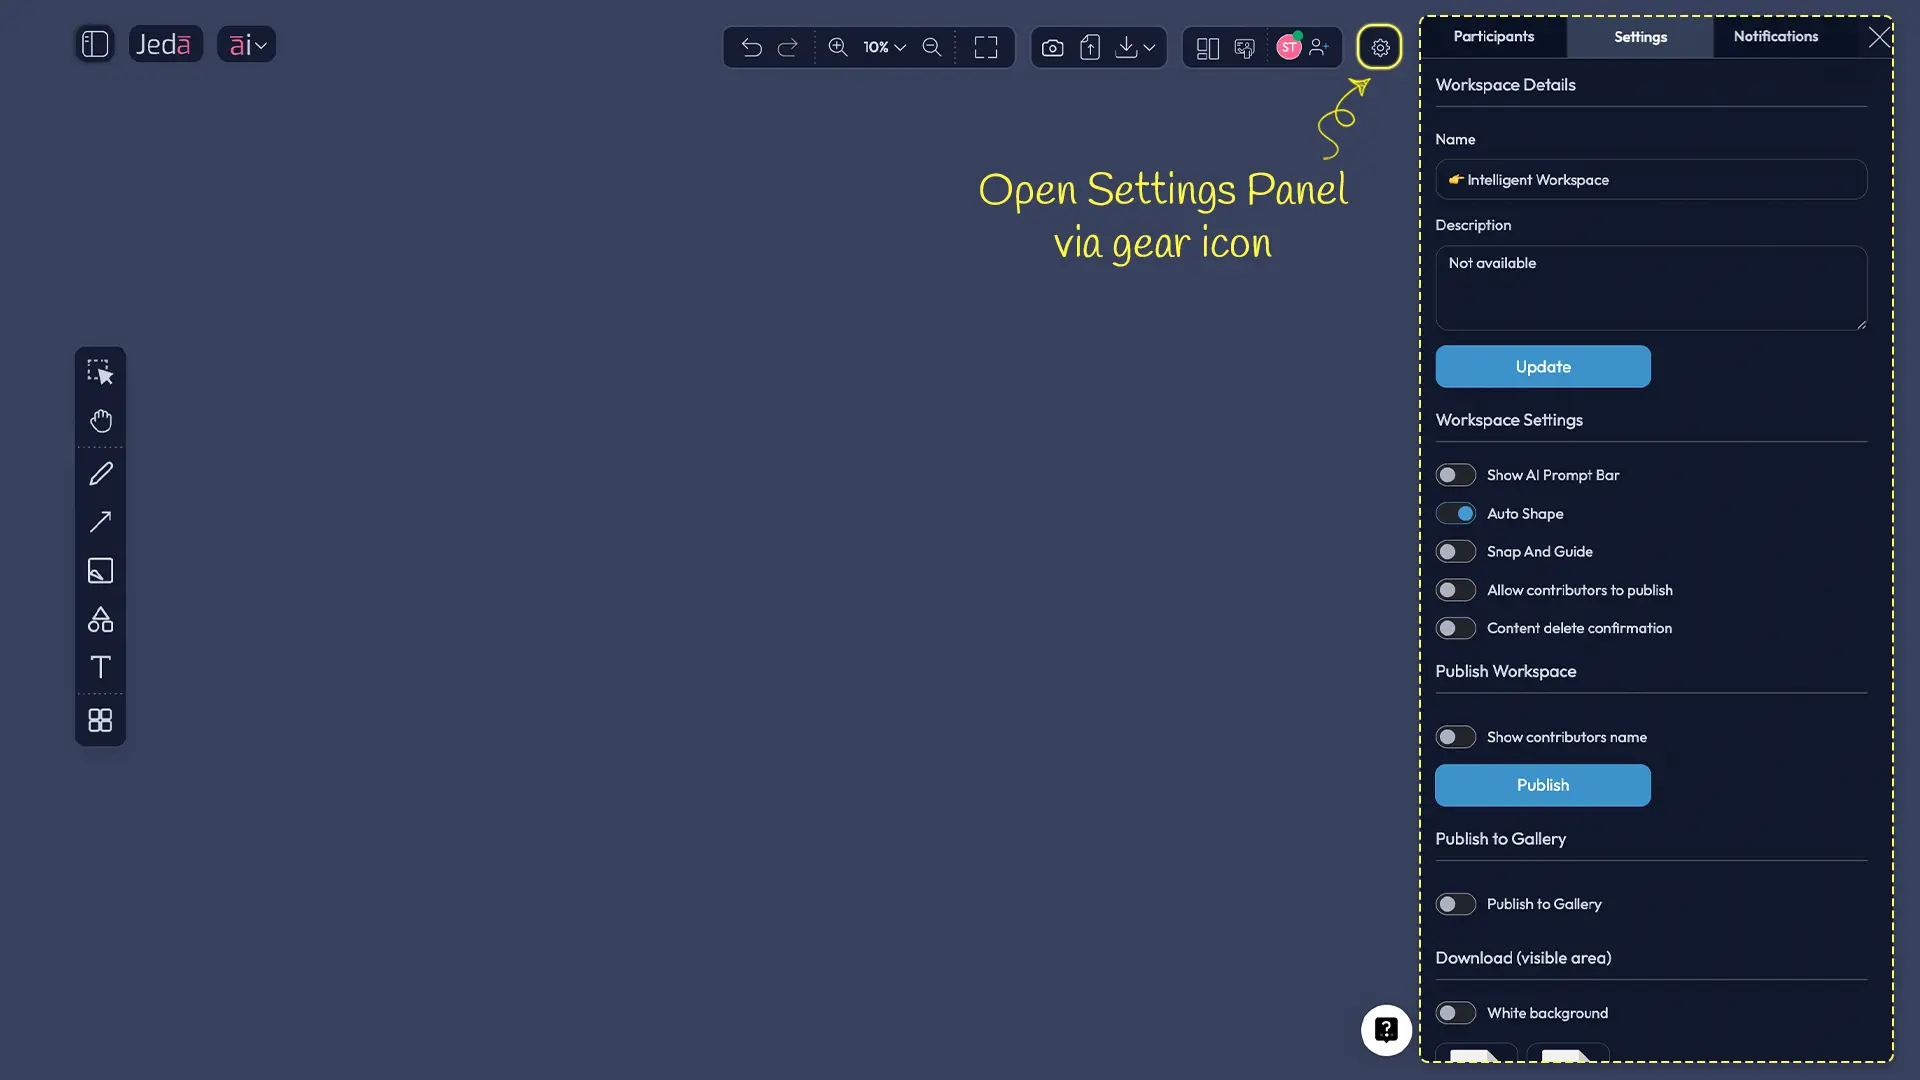
Click the gear icon (⚙️) in the top-right toolbar. The settings panel slides in from the right side with three tabs: Participants, Settings, and Notifications. The Settings tab is where customization happens. Here you'll find Workspace Details (name and description), a series of toggles for feature control, publishing options, and download tools. Every setting is optional. Every toggle defaults to what works for most users. But the power is in customizing to your exact workflow.
Workspace Details: Name and Description
Every workspace deserves a clear name and a purpose statement. In Workspace Details, you set both.
The Name field is what appears in your dashboard and in the Left Panel. Keep it clear and project-specific: "Client Proposal Q2 2026" is better than "Work Stuff." Names help you and your collaborators find the right workspace quickly.
The Description field is optional but powerful. Add context: "SWOT analysis and competitive positioning for new product launch." A sentence here helps teammates understand the workspace purpose without asking. Click Update to save both fields.
Show AI Prompt Bar Toggle
By default, the Prompt Bar is visible at the bottom center of your workspace. It's your primary AI interaction point. Toggle it off if you need maximum canvas space—for example, when presenting your work or when you want a distraction-free whiteboard.
When the Prompt Bar is hidden, you still have access to slash commands. Type your prompt directly on the canvas followed by a slash command (e.g., "Create a flowchart /flowchart"), and Jeda processes it the same way. Toggle the Prompt Bar back on whenever you need it.
Best for: Solo thinking, full-screen presentations, or minimal-UI work sessions.
Auto Shape Toggle — Hand-Drawn Recognition
Enable Auto Shape if you sketch on the canvas. When you draw a line, circle, rectangle, or diamond with the Pen tool, Jeda auto-detects the shape and transforms it into a perfect geometric version. Hand-drawn lines become straight lines. Sketchy circles become perfect circles. The output retains a natural, hand-drawn feel—not rigid CAD-like perfection, but intelligent beautification.
This is a game-changer for designers prototyping wireframes or consultants sketching flowcharts. Draw at natural speed. Jeda perfects the shapes. No editing required.
Best for: Product designers, UX teams, wireframing workflows, design thinking sessions.
Snap And Guide Toggle — Alignment Helpers
Enable Snap And Guide if you're building structured diagrams. As you move objects on the canvas, alignment guides appear—thin lines showing when objects align with neighbors. They help you create clean, organized visuals without manual pixel-counting.
Some users find guides helpful for precision work. Others find them intrusive during freeform ideation. Toggle it based on your current task.
Best for: Structured frameworks (SWOT matrices, org charts), formal diagrams, presentation-ready visuals. Disable for brainstorming or rough sketching.
Allow Contributors to Publish Toggle
When you invite teammates to a shared workspace, this toggle controls whether they can publish the workspace to the Jeda.ai Gallery—our community showcase of great work.
Enable it if you want teammates to freely share your collective work. Disable it if you want to control what represents your team publicly. This doesn't limit collaboration or sharing—only gallery visibility.
Best for: Teams with public-facing work, community-driven projects. Disable for confidential client work.
Content Delete Confirmation Toggle
Enable this toggle to add a confirmation dialog before deleting any object on the canvas. It's a safety feature. Prevents fat-fingering disasters when editing quickly.
For solo work, you might not need it. For teams with shared workspaces, it's strongly recommended. Accidental deletion can't be undone with undo if the object wasn't selected properly.
Best for: Shared workspaces, team projects, risk-averse workflows.
Theme Switching: Whiteboard vs. Darkboard
Light Mode (Whiteboard) for Daytime Work
Whiteboard is the light theme. Clean, bright, high-contrast. Perfect for daytime work, presentations, or bright office environments. Text is dark on light background. Interfaces feel open and airy.
When to use: Morning and afternoon work sessions, client presentations, screen-sharing demos, bright environments, printing/exporting work.
Dark Mode (Darkboard) for Long Sessions
Darkboard is the dark theme. Reduced brightness, lower contrast, gentler on eyes. Reduces eye strain during extended work sessions—especially in low-light environments. Dark modes also consume less battery on OLED screens.
When to use: Evening work, long analysis sessions, low-light environments, extended design sprints, all-day collaboration.
How to Switch Themes
Open the Left Panel by clicking the three-line toggle in the top-left corner. Near your plan badge, you'll see a theme toggle button (typically a sun/moon icon). Click it to switch between Whiteboard (light) and Darkboard (dark). The change applies instantly to your entire workspace. All collaborators in shared workspaces see the same theme instantly.
You can switch themes as often as you want. No penalty. No lag. Work your way.

Complete Keyboard Shortcuts Reference
Node and Object Creation
Tab – Create a connected branching node
- Select any object (shape, sticky note, matrix cell)
- Press Tab
- A new connected node appears, linked to the parent
- Press Tab again to add another level
- Fastest way to build mind maps and hierarchies
Cmd+↑ (Up) / Cmd+↓ (Down) / Cmd+← (Left) / Cmd+→ (Right) – Duplicate selected object in that direction
- Select an object on the canvas
- Press Cmd+Arrow (any direction)
- A copy appears instantly in that direction
- Perfect for rapid matrix prototyping or expanding diagrams
- Windows/Linux: Ctrl+Arrow
Tool Switching
Cmd+E or Esc – Toggle between Select (🖱️) and Drawing (✏️) modes
- Lets you quickly switch between selection and drawing without using the toolbar
- Select mode: Click to select objects
- Drawing mode: Click to draw shapes, lines, text
Spacebar (hold) – Temporarily switch to Pan (✋)
- While holding Spacebar, your cursor becomes a pan hand
- Click and drag to move around the canvas
- Release Spacebar to return to your previous tool
- Great for large, zoomed-in canvases
Double-click object – Select it even while drawing tool is active
- When you're in Drawing mode and want to select something quickly
- Double-click any object to select it
- Switch back to drawing with Esc
Double-click empty area – Return to Drawing mode
- When in Select mode, double-click blank canvas
- Switches back to Drawing/Pen tool
- Seamless mode switching for rapid ideation
General Editing
Cmd+Z – Undo the last action | Cmd+Shift+Z – Redo
- Cmd+Z reverts one step at a time
- Jeda maintains 25 steps of undo history
- Each AI generation counts as a single undo step
- Windows/Linux: Ctrl+Z and Ctrl+Shift+Z
Cmd+'+'/'-' – Zoom in and out
- Increase or decrease canvas magnification
- Works at any zoom level
- Smoother than mouse wheel; good for rapid zoom adjustments
Fit to Screen – Auto-fit all content on canvas (often Cmd+Shift+1 or top-right toolbar)
- Instantly zooms and pans to show everything on canvas
- Useful after generating large diagrams or when you lose track of your work
Selection and Clipboard
Shift+Click – Add to selection
- Click one object to select it
- Shift+Click additional objects to multi-select
- Great for bulk operations (move, resize, delete together)
Click and drag – Selection rectangle
- Click on empty canvas and drag to create a rectangle
- Everything inside the rectangle gets selected
- Multi-select without Shift-clicking individually
Cmd+C – Copy selected object(s)
- Copies to clipboard
- Can paste in same workspace, different workspace, or external apps (Word, PowerPoint, etc.)
Cmd+V – Paste images or text from system clipboard onto canvas
- Paste objects you've copied from Jeda
- Paste images from web or system clipboard
- Paste text directly onto canvas (creates text element)
Type anywhere on canvas – Click empty location and start typing
- No tool selection needed
- Text element appears instantly at cursor position
- Works while other tools (pen, eraser) are active
Canvas Navigation
Arrow keys – Move selected objects or pan canvas
- Select an object and press Arrow keys to move it precisely
- With nothing selected, Arrow keys pan the canvas
- Useful for fine-positioning without mouse
Shift+Arrow – Move in larger increments
- Moves objects or canvas by larger step size
- Good for big repositioning quickly
Pinch (trackpad) – Zoom in/out
- Two-finger pinch-to-zoom on MacBook trackpad
- Intuitive; matches standard gesture
Two-finger swipe (trackpad) – Pan canvas
- Two-finger swipe left/right/up/down
- Smoothly pans without clicking Spacebar
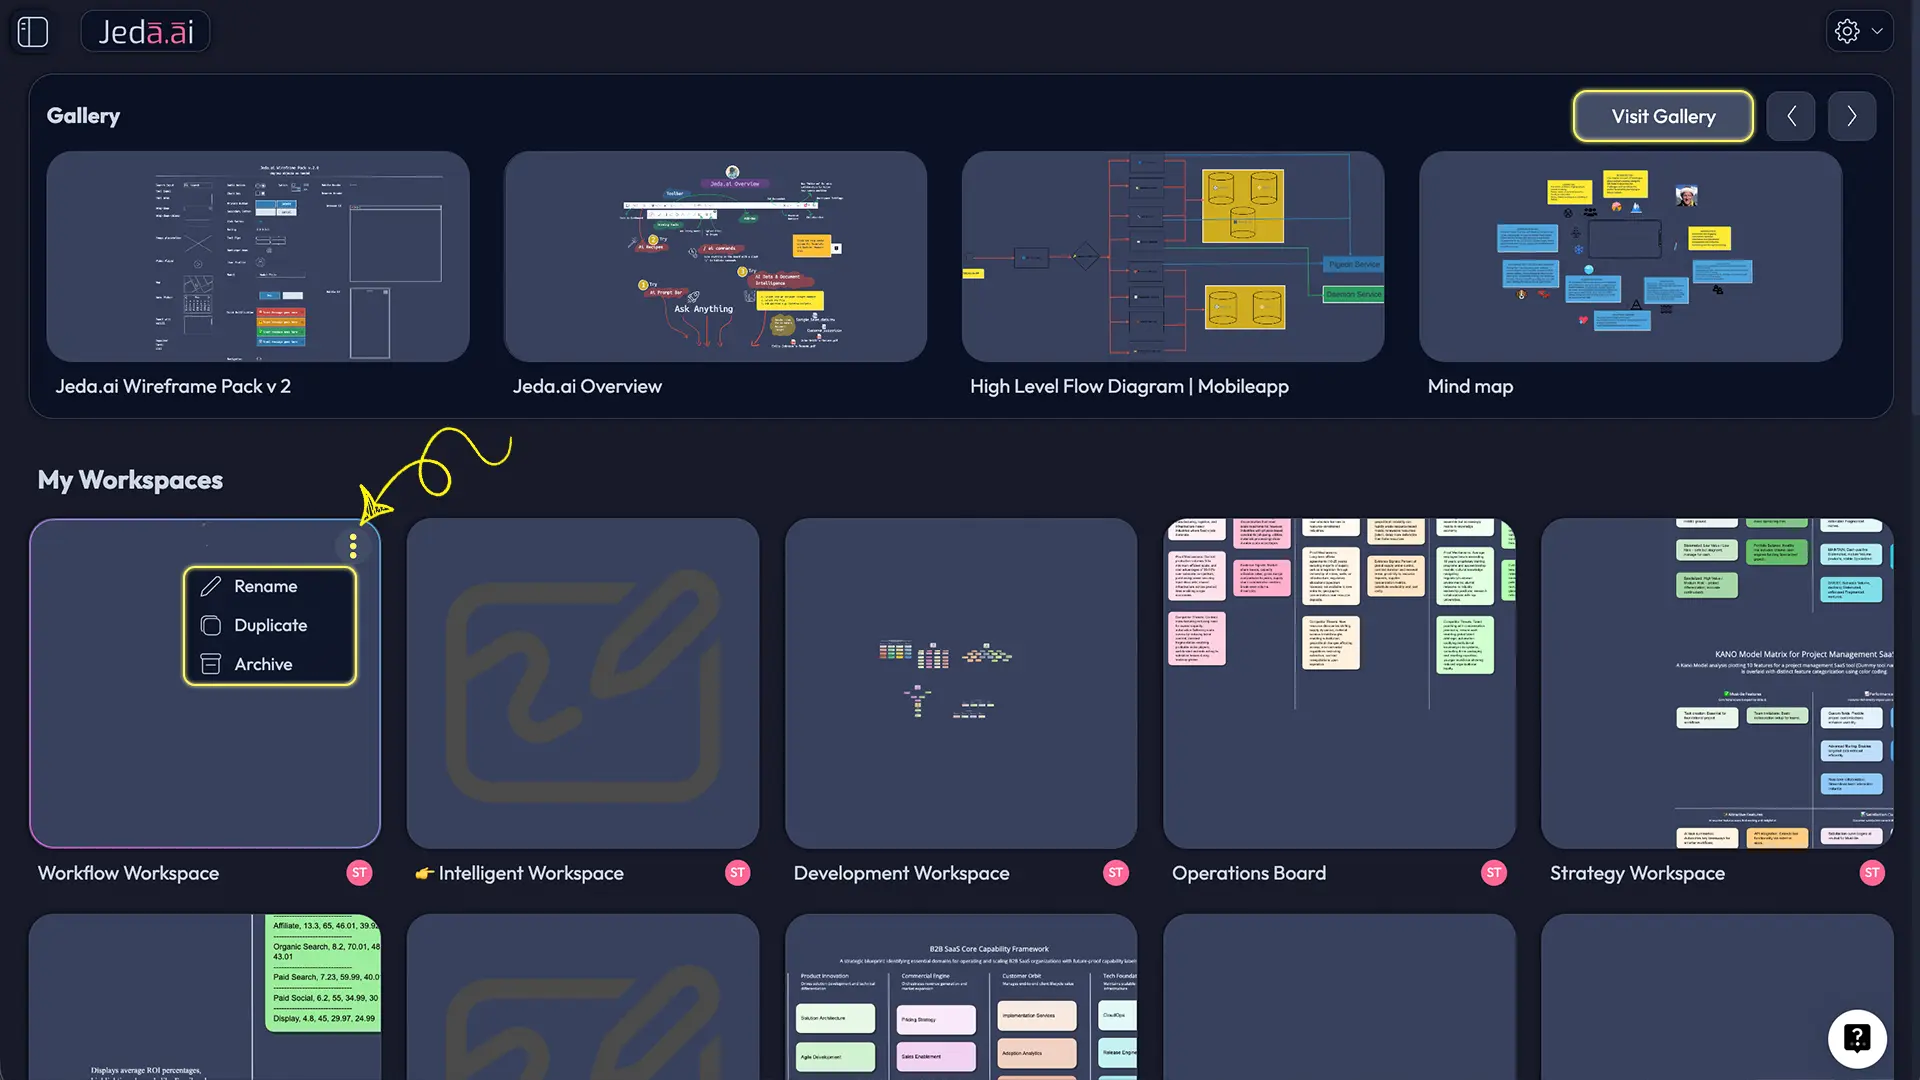
Workspace Management: Rename, Duplicate, Archive, Delete
Renaming Your Workspace
- Open your Workspace Dashboard (top-left, click Jeda logo if not already there)
- Hover over the workspace card you want to rename
- Click the three-dot menu (⋮) that appears
- Select Rename
- Type the new name
- Click Save
Renamed workspaces update everywhere instantly—Left Panel, shared links, collaborator views.
Duplicating a Workspace
Need to start a new project based on an existing workspace? Duplicate it.
- From the Workspace Dashboard, hover over any workspace
- Click the three-dot menu (⋮)
- Select Duplicate
- Jeda creates an exact copy with all content, settings, and collaborators
- The copy is named "[Original Name] - Copy"
- Rename it immediately to avoid confusion
This is faster than starting from scratch and perfect for creating project templates.
Archiving vs. Deleting
Understand the difference before taking action.
Archive – Hides the workspace from your main list but preserves it permanently. All content, collaborators, and history remain intact. Archived workspaces are moved to a separate section (visible in Left Panel → Shared With Me or archive section). You can unarchive anytime with no data loss.
Delete – Permanently removes the workspace. All content, history, and collaborator access is gone forever. No recovery. No undo. Use only when certain.
Best practice: Archive first. Delete only after confirming you'll never need the workspace again.
Recovering an Archived Workspace
- Open the Left Panel (top-left toggle)
- Look for Archived Workspaces section at the bottom (or in Shared With Me if archived by a collaborator)
- Click the three-dot menu on the archived workspace
- Select Unarchive
- The workspace reappears in your main workspace list
Unarchiving is instant and complete. No data is lost during archive.
AI Task Panel & Chat History Management
Understanding the AI Task Panel
When you generate a visual in Jeda.ai (using any command), a panel slides in on the right side of your screen. This is the AI Task Panel.
For visual commands like Matrix, Mindmap, Flowchart, Diagram, and others, the panel streams your AI response in real time. You'll see the prompt being processed and the visual structure as it's built. The response is usually complete within seconds.
For Image/Art generation, the panel shows a loading indicator. The final image renders on the canvas when complete.
You can scroll through the panel to review the full AI response. An Abort button lets you cancel generation if it's taking too long or going in the wrong direction.
Tip: The AI Task Panel is read-only during generation. After generation completes, the panel stays visible but doesn't accept input. Close it by clicking the X or clicking elsewhere on the canvas.
Managing Chat History
The Chat History button is in the Prompt Bar (bottom-right, chat bubble icon). Click it to open a panel showing all previous prompts and AI responses for this workspace.
Use Chat History to:
- Review past prompts and results
- Regenerate similar visuals (copy an old prompt, modify it, generate)
- Understand how you approached previous problems
- Share prompts with teammates
Chat History is workspace-specific and shared with all collaborators. Everyone in the workspace sees the same history.
Clearing Context for Fresh Prompts
Below Chat History, you'll find a "Clear Chat Context" button. This resets the AI conversation context. Use it when switching between completely different tasks—for example, transitioning from market analysis to product wireframing. Clearing context tells the AI to forget previous conversation direction and start fresh.
You don't need to clear context often. The AI is good at understanding context shifts in your prompts. But if you feel the AI is pulling from old prompts when it shouldn't, clearing context resets everything.
Productivity Workflows Using Shortcuts
Workflow 1: Rapid Mind Map Creation
Goal: Build a mind map in under 2 minutes.
- Open a workspace
- Type your central idea in the Prompt Bar: "Create a mind map for product launch strategy"
- Press Enter (or click Generate)
- Jeda generates the initial mind map
- Select a node you want to expand
- Press Tab to add a child node
- Type your new idea
- Press Tab again to add another sibling
- Keep pressing Tab and typing to build out branches rapidly
- Use Cmd+Arrow to duplicate entire branches if you want similar structures
Result: A fully-formed mind map built collaboratively with AI and your keyboard. No mouse dragging required.
Workflow 2: Matrix Prototyping with Duplication
Goal: Create a 4x4 matrix in seconds, then experiment with variations.
- Use the Prompt Bar: "Create a 2x2 growth matrix for [your company]"
- Jeda generates the matrix with AI-filled content
- Select one matrix cell
- Press Cmd+Right to duplicate it to the right
- Repeat Cmd+Right to fill the row
- Press Cmd+Down to duplicate rows downward
- Click cells to edit content quickly
- Use Cmd+Z to undo entire rows if needed
Result: Rapid matrix prototyping with duplication shortcuts replacing copy-paste clicks.
Workflow 3: Canvas Navigation for Large Projects
Goal: Navigate a sprawling canvas with dozens of diagrams without losing orientation.
- Generate multiple visuals (several flowcharts, matrices, mindmaps)
- When zoomed in and lost, press Cmd+Shift+1 (or Fit to Screen button)
- See your entire canvas at once
- Click a specific visual to zoom back in
- Use Spacebar+Drag for quick panning without adjusting zoom level
- Use Arrow keys to move through objects methodically
Result: Large projects stay navigable. No scrolling endlessly or losing your place.
Power User Tips & Hidden Features
Keyboard Shortcut Optimization
One-handed workflows — Most Jeda shortcuts are Mac-biased (Cmd = Mac native). If you work with Windows, learn Ctrl equivalents to match. Your left hand stays on Ctrl; right hand on arrow keys.
Custom shortcuts — Your OS might override some Jeda shortcuts. Check System Preferences (Mac) or Keyboard Settings (Windows) if shortcuts aren't working as expected.
Muscle memory — Practice Tab and Cmd+Arrow until they're automatic. These two shortcuts alone save hours per project.
Combine shortcuts — Tab creates nodes; then Cmd+Left/Right duplicates them sideways. Combine for exponential speed.
Workspace Organization Best Practices
Naming convention — Use "[Project Name] - [Workflow Stage]" for clarity. Examples:
- "Acme Corp - Proposal SWOT"
- "Q2 Planning - Competitive Analysis"
- "Team Brainstorm - Lean Canvas Draft"
Archive old projects — At quarter end or project completion, archive completed workspaces. Keeps your dashboard clean. Archived workspaces are instantly recoverable if needed.
Use descriptions — Add a one-sentence description in Workspace Details. Helps you (and teammates) remember context 3 months later.
Duplicate for variations — Instead of editing existing workspaces, duplicate them. Keep original versions intact. Great for comparing options.
One workspace per major project — Resist creating sub-workspaces within projects. Keep structure flat and simple.
Theme and Settings Best Practices
Dark mode for evenings — If you work evenings regularly, train yourself to switch to Darkboard. Eye strain matters over time.
Prompt Bar toggle for presentations — Before sharing your screen, hide the Prompt Bar (toggle off). Shows clean, focused visuals to your audience.
Auto Shape only if sketching — Don't enable it if you're purely typing and clicking. Saves CPU and reduces unexpected behavior.
Snap And Guide for formal work — Enable for client deliverables or polished presentations. Disable for rough drafts and brainstorms.
Delete Confirmation for teams — Always enable in shared workspaces. Disable only if you trust yourself implicitly in solo projects.
Frequently Asked Questions
- How do I access workspace settings?
- Click the gear icon (⚙️) in the top-right toolbar. The settings panel slides in from the right. Select the Settings tab to adjust workspace configuration, toggle features, and manage publishing options.
- What's the difference between Whiteboard and Darkboard?
- Whiteboard (light mode) is best for daytime and presentations. Darkboard (dark mode) reduces eye strain during long sessions. Switch anytime in the Left Panel near your plan badge—changes apply instantly.
- How do I hide the Prompt Bar to get more canvas space?
- In Workspace Settings, toggle off 'Show AI Prompt Bar.' The bar disappears, giving you a full canvas. You can still use slash commands by typing directly on the canvas. Toggle the bar back on anytime.
- What's the Tab keyboard shortcut and when should I use it?
- Select an object and press Tab to create a connected branching node. Fastest way to build mind maps and hierarchies. Each Tab adds a new connected element linked to the parent. Press Tab repeatedly to expand trees.
- How does Cmd+Arrow duplication work?
- Select an object and press Cmd+↑↓←→ to duplicate it in that direction instantly. Creates copies for rapid matrix and diagram prototyping. Windows: Ctrl+Arrow. Combine with Tab and typing for exponential speed.
- What does 'Auto Shape' do?
- When enabled in Workspace Settings, hand-drawn lines and shapes are auto-detected and transformed into perfect geometric shapes—straight lines, perfect circles, precise rectangles. Great for designers sketching wireframes or flowcharts.
- What's the undo history depth?
- Jeda maintains 25 steps of undo history. Press Cmd+Z to revert one step at a time. Each AI generation counts as a single undo step. Experiment fearlessly knowing you can revert almost anything.
- What does 'Snap And Guide' do?
- When enabled, alignment guides appear as you move objects, helping you position elements precisely and create organized visuals. Useful for structured diagrams. Disable if guides feel intrusive during freeform work.
- Can I have multiple workspaces?
- Yes. White Belt (free plan) allows 3 workspaces. Black Belt allows unlimited. Paid plans (Shifu, Alchemist) allow unlimited. Use the Left Panel to create new workspaces. Each is independent and isolated.
- What happens when I archive a workspace?
- Archived workspaces are hidden from your main list but preserved permanently. All content, collaborators, and history remain intact. Access archived workspaces in the Left Panel. Unarchive anytime with no data loss.
- What's 'Allow Contributors to Publish'?
- This permission setting controls whether invited teammates can publish your shared workspace to the Jeda.ai Gallery—our community showcase. Enable if you want teammates to share work publicly. Disable to control gallery submissions.
- Should I enable 'Content Delete Confirmation'?
- Recommended for shared workspaces and team projects. Adds a confirmation dialog before deleting objects, preventing accidental data loss. Not critical for solo work if you're careful. Essential for collaborative projects.
- [1]
Nielsen, J. & Norman, D. A. (2000) . “10 Usability Heuristics for User Interface Design” Nielsen Norman Group.
View Source ↗ - [2]
Card, S. K., Moran, T. P., & Newell, A. (1983) . “The Psychology of Human-Computer Interaction” Lawrence Erlbaum Associates.
View Source ↗
Master Your Workspace Today
Join over 150,000 professionals using Jeda.ai for strategic thinking and visual planning. Customize your AI Workspace with shortcuts and settings designed for power users. Start your free trial—no credit card required.
Start Free Trial